


Adding Network Elements to your Map 6-23
Creating Network Maps
Adding Network Elements to your Map
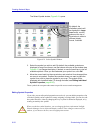
For the most part, adding a device icon to a map simply involves dragging the selected
icon or icons from any one of the available views or from another map, or using the
standard Copy and Paste commands. When you perform a network Discover operation, all
discovered devices are automatically added to the central node database maintained by
NetSight Element Manager, and they will automatically appear in the appropriate list and
tree views; adding individual devices from the primary window menu bar (via
Insert—>Device) or from the toolbar (via the Insert Device icon) when no map
window is active also places the information directly into the central node database (and
the appropriate views).
To move a single device from a view onto a map, use the left mouse button to click on the
device you wish to add, and drag it into the appropriate map window; to move more than
one device, use shift-click or ctrl-click to select all of the nodes you want to move.
However, you can also add a new device directly to a map (and automatically to the node
database and all appropriate views); this process is described in the following sections.
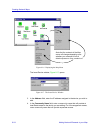
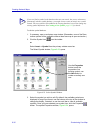
Adding a Device Directly to a Map
1. Open or activate (as appropriate) the map window to which you wish to add a
new device.
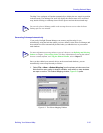
2. In the primary window menu bar, select Insert—>Device.
or
In the toolbar, click the Insert Device icon.
or
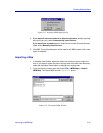
Anywhere within the selected map window (even on an existing icon, if you
want), click the right mouse button to display the Map menu (as illustrated in
Figure 6-16). Click again to select New Device.