


Creating Network Maps
6-50 Customizing Your Map
4. Objects on your map will be confined within a resizable border that contains a
pictorial representation of the object data. The pictorial representation may be
an icon to indicate the linked or embedded document, or the source data itself
may be visible within the border. Resizing the border will scale the object’s
pictorial representation (the icon or the data).
The pictorial display of an object will depend on its creating application type.
For example, a Paintbrush picture object can display as the actual drawing or
as a Paintbrush document icon; a Microsoft Word document or an object
Package will always appear as an icon within the border.
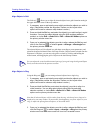
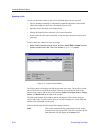
If you want to display the object as an icon within a border, or change the icon
that will be associated with the embedded or linked object:
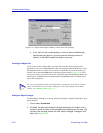
a. Click to check the Display As Icon selection box in the Insert Object
window (shown in Figure 6-33). The active icon associated with the object
data type displays immediately below the field, along with a button
allowing you to change the icon. By default, the object’s active icon will be
determined by the creating application.
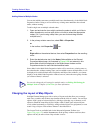
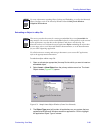
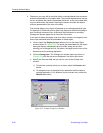
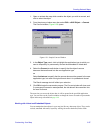
b. Click on Change Icon. The Change Icon window opens (as shown in
Figure 6-32), with the active icon displayed in the lower right corner.
c. Specify the icon and label that you want to use via the Change Icon
window:
1.) To leave the currently active icon in place, select the Current radio
button.
2.) To change the icon to the default icon associated with the object’s
creating application (if it is different from the current icon), select the
Default radio button.
Figure 6-32. Sample Change Icon Window