


Customizing Your Map 6-35
Creating Network Maps
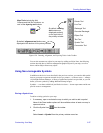
If you are creating a rectangle or ellipse, click and hold the mouse button
and drag to create the size and shape object you want. Releasing the mouse
button completes the object, but note that the crosshair cursor remains,
allowing you to draw additional objects of the same shape without having to
re-select the tool.
If you are creating a line, click the mouse button once to place the beginning
line point, then move the cursor in the direction you wish to draw your line.
Each time you single-click on the mouse button, a line segment is completed;
at the end of each line segment, you can either change directions and draw
an additional, attached line segment, or double-click to complete the line.
Note that once your line is complete, the crosshair cursor is returned to its
pointer state; to draw additional lines, re-select the line tool.
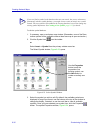
Once you’ve created an object, you can edit its graphical properties (such as fill, line type,
and color) via the appropriate Properties window.
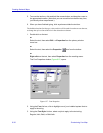
To access the Properties window:
1. Double-click on the object.
or
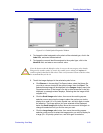
Select the object and then select Edit —> Properties from the primary
window menu bar.
or
Select the object, then select the Properties icon from the toolbar.
or
Right-click on the object, then select Properties from the resulting menu.
The appropriate Properties window, as illustrated in Figure 6-26, opens.