


Creating Network Maps
6-20 Importing an MRM Map
Importing an MRM Map
If you are upgrading from an earlier version of NetSight Element Manager, your map files
should be backed up and restored automatically as part of the install process, and should
open in their original condition.
Although the .MRM maps are no longer a necessary step in converting your files from one
version to another, you may still find that you occasionally need to import an .MRM file.
Each map file in NetSight Element Manager is saved in both .MAP format (the format
read by NetSight Element Manager) and in .MRM format (a text-based human readable
version). If a .MAP file becomes corrupted, you may be able to recover your map by
importing the .MRM file. If you inadvertently delete a .MAP file, the accompanying
.MRM file is not automatically removed, and it can be re-imported. Or if you want to
move a map file from one workspace folder to another, you can achieve this by deleting
the .MAP file from the workspace, selecting the folder you want to move the map to, and
importing the associated .MRM file into that new folder.
When you import an .MRM file, NetSight Element Manager first checks your current
central node database for information about the nodes contained in the .MRM map. If
those nodes have already been added to the node database, the appropriate icons are
automatically added to the imported map. If those nodes are not yet in the database,
NetSight Element Manager will try to re-discover them either individually or as a group,
depending on the import option you have selected.
If you import an .MRM file which contains a device that is currently in the Excluded
Nodes database, the icon will be imported as a gray question mark. Double-clicking on
this icon will initiate the normal add device process; however, before the device is added
to the map, you will be notified that it is in the Excluded Nodes list, and asked if you want
to include it. If you say no, the icon will remain gray; if you say yes, the icon will be
displayed normally, and the device will be re-added to the central node database.
If you import a root map, its associated submaps will be imported automatically, and all
hierarchical relationships will be restored.
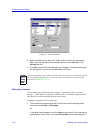
Setting MRM Import Options
The Importing MRM Maps Options window allows you to determine how NetSight
Element Manager will handle the re-discovery of nodes in your .MRM maps that are not
present in your current central node database.
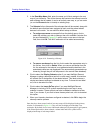
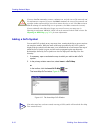
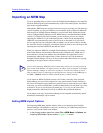
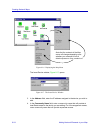
1. In the primary window menu bar, select File—>MRM Maps—>Options; the
Importing MRM Maps Options window, Figure 6-13, opens.
TIP
If you will be importing .MRM files which contain many devices not currently present in
your central node database, the import process can take a while to complete, as NetSight
Element Manager attempts to re-discover each device. To reduce the amount of time it
takes to import a map, try adjusting your polling and retry settings via the Node page in
the Tools—>Options window available from the primary window menu bar.