


Discovering Nodes
3-28 Using the Subnets Window
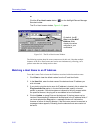
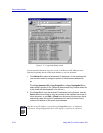
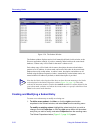
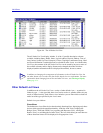
Figure 3-20. The Subnets Window
The Subnets window displays entries for all manually-defined (via this window or the
Discover application) subnets; if you have manually added a node to the central node
database, a subnet entry will be listed for that node’s subnet as well.
Each subnet entry will be listed with its name, description, the network and subnet
portions of its IP Address, its subnet mask, and count of the nodes in the central node
database that reside on that subnet. A subnet’s name, description, and address are all
defined using the Subnet Properties window. Automatically-created subnet entries are
named with their IP address by default; no default description is provided.
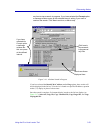
Creating and Modifying a Subnet Entry
To create a new subnet entry or modify an existing one:
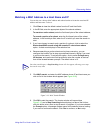
1. To define a new subnet, click New; or click the right mouse button
anywhere in the Subnets window, and select New from the resulting menu.
To modify an existing subnet, highlight the subnet entry that you wish to
change, and click Properties; or click the right mouse button on the subnet
entry that you wish to modify, and select Properties from the resulting menu.
The Subnet Properties window (Figure 3-7, page 3-10) opens.
TIP
Note that the Nodes value displayed here does not have the same meaning as the Nodes
value displayed in the Subnet Properties window (Figure 3-6, page 3-8); that value
indicates the maximum number of nodes that could be included in a subnet defined by the
given subnet mask, and does not indicate how many nodes on a specific subnet have been
added to the central node database.