


Customizing Your Map 6-57
Creating Network Maps
1. Open or activate the map which contains the object you wish to convert, and
click to select the object.
2. From the primary window menu bar, select Edit—>XXX Object—>Convert.
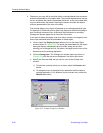
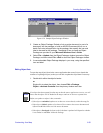
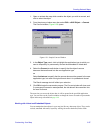
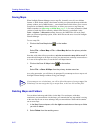
The Convert window, Figure 6-36, opens.
Figure 6-36. Sample Convert Window
3. In the Object Type panel, click to highlight the application type to which you
want to temporarily or permanently convert the embedded or linked data.
4. Select the Convert to radio button to specify that the object’s source
document be transformed into the new application type.
or
Select Activate as to specify that the source document be opened in the new
application type, but retain its original format when it is updated and closed.
The Result message text will reflect your selection.
5. Click OK to begin the conversion process. The Convert window will close, and
if a permanent conversion was specified, the old data will be overwritten into
the new file format.
The next time you access the object data, it will be opened in the specified application
type. You can also use the Convert window to change the icon to be used to represent the
object in the map, as detailed on page 6-49.
Working with Linked and Embedded Objects
You can manipulate data objects in your map just like any other map object. They can be
resized, annotated with notes, layered by moving forward or backward, and so forth.