


6-1
Chapter 6
Creating Network Maps
Building a map hierarchy; about the Map View; creating new maps; adding submaps and GoTo
symbols; generating submaps automatically; adding nodes to a map; importing MRM maps;
customizing your maps; aligning map objects; saving maps
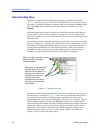
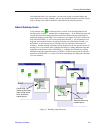
NetSight Element Manager’s mapping capabilities provide a powerful means for creating
logical and/or physical representations of your network. Unlike List and Tree Views, Map
Views are not populated automatically; you can create as many maps as you need, and add
and arrange node icons in any way you like. Maps can also be nested via a submap
hierarchy, which can be displayed at a glance via the Map View page in the workspace.
You can add device icons directly to your maps, or simply drag them in from any existing
view; you can also add a variety of symbols to your map, and take advantage of
Microsoft’s Object Linking and Embedding (OLE) technology to add objects created by
other applications.
Working with Maps
NetSight Element Manager creates and maintains maps without assigning any default
hierarchical structure to them: each map is created and maintained as an independent file.
If you wish, however, you can define relationships among any number of independent
maps by establishing links between them. These links set up a sequence of status reporting
that results in a de facto hierarchical structure defined by the direction in which maps
report their status to other linked maps.
NetSight Element Manager allows you to create a nested hierarchy of maps via the use of
submap icons. In this nested hierarchy — which can be adjusted and changed as needed
— each map reports its status (and the status of its subparts) to all related maps.