


Using the Subnets Window 3-27
Discovering Nodes
Using the Subnets Window
With the Subnets window, you can define and view subnet entries which can be used in
Discover scripts. The Subnets window is accessed by selecting View—>Subnets from the
NetSight Element Manager primary window menu bar. Any subnet entries that appear in
the Subnets window will also appear in the Subnets group box on the Device page of the
Discover Properties window, and vice versa (see Defining and Selecting Subnets,
page 3-7).
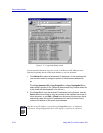
The Subnets window will list subnet entries for any subnet on which an IP or Subnet
Discovery has been previously performed. For example, if you have previously performed
an IP Discovery using the IP Address range of 132.177.118.0 —> 132.177.118.100, the
Subnets window will contain an entry for the 132.177.118.0 subnet (assuming that this is a
Class B network, with a subnet mask of 255.255.255.0).
If you have manually added a device to a view or a map, a subnet entry will be listed for
that device’s subnet as well. For example, if you manually add a device with an IP address
of 132.177.118.24 to any of your views or maps, the Subnets window will contain an entry
for the 132.177.118.0 subnet (assuming that this is a Class B network, with a subnet mask
of 255.255.255.0).
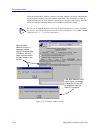
When defining subnet entries using the Subnets window, you use the same Subnet
Properties window that is used in the Discover application when defining subnets for use
in a Discover script.
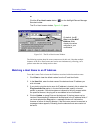
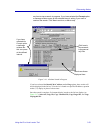
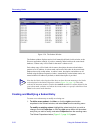
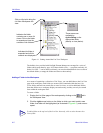
To launch the Subnets window from the NetSight Element Manager primary window:
1. Select View—>Subnets from the primary window menu bar. The Subnets
window, Figure 3-20, opens.
TIP
This subnet information is used to determine the map hierarchy created via the automatic
subnet mapping feature; for more information on this feature, see Generating Submaps
Automatically in Chapter 6, Creating Network Maps