


11-15
ATM Switch Router Software Configuration Guide
OL-7396-01
Chapter 11 Configuring ATM Routing and PNNI
Basic PNNI Configuration
Entering the scope mode automatic command ensures that all organizational scope values cover an area
at least as wide as the current node’s peer group. Configuring the scope mode to manual
disables this
feature and no changes can be made without explicit configuration.
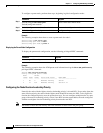
To configure the PNNI scope mapping, perform these steps, beginning in global configuration mode:
Example
The following example shows how to configure PNNI scope mapping manually so that organizational
scope values 1 through 8 map to PNNI level 72:
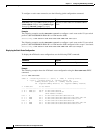
Switch(config)# atm router pnni
Switch(config-atm-router)# node 1
Switch(config-pnni-node)# scope mode manual
Switch(config-pnni-node)# scope map 1 8 level 72
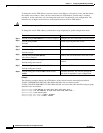
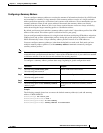
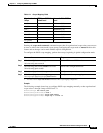
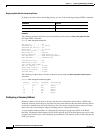
Table 11-1 Scope Mapping Table
Organizational
Scope
ATM Forum PNNI 1.0
Default Level
Automatic Mode PNNI
Level
1 to 3 96 Minimum (l,96)
4 to 5 80 Minimum (l,80)
6 to 7 72 Minimum (l,72)
8 to 10 64 Minimum (l,64)
11 to 12 48 Minimum (l,48)
13 to 14 32 Minimum (l,32)
15 (global) 0 0
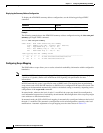
Command Purpose
Step 1
Switch(config)# atm router pnni
Switch(config-atm-router)#
Enters ATM router PNNI mode.
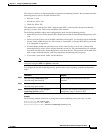
Step 2
Switch(config-atm-router)# node node-index
Switch(config-pnni-node)#
Enters node configuration mode.
Step 3
Switch(config-pnni-node)# scope mode manual Configures scope mode as manual.
1
1. You must enter the scope mode manual command to allow scope mapping configuration.
Step 4
Switch(config-pnni-node)# scope map
low-org-scope [high-org-scope] level number
Configures node scope mapping.