


A-10
ATM Switch Router Software Configuration Guide
OL-7396-01
Appendix
Adding a New Lowest Level of PNNI Hierarchy
Switch T4 Initial Configuration
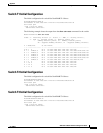
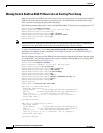
The initial configuration for switch SanFran.BldA.T4 follows:
hostname SanFran.BldA.T4
atm address 47.0091.4455.6677.2233.1011.1266.0060.3e7b.2001.00
atm router pnni
node 1 level 56 lowest
redistribute atm-static
Switch T5 Initial Configuration
The initial configuration for switch SanFran.BldA.T5 follows:
hostname SanFran.BldA.T5
atm address 47.0091.4455.6677.2233.1011.1244.0060.3e7b.2401.00
atm router pnni
node 1 level 56 lowest
redistribute atm-static
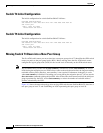
Moving Switch T4 Down into a New Peer Group
The first ATM switch router you move down into a new peer group at level 72 should be the ATM switch
router you prefer as the peer group leader (PGL). Before moving down the first ATM switch router,
configure the logical group node (LGN) for the second level of hierarchy on the ATM switch router.
Note We recommend that you enter the no auto-summary command to disable auto-summary on all new
LGNs during the migration process. PNNI always routes to the node that advertises the longest matching
reachable address prefix; therefore, auto-summary is not required. Furthermore, debugging is easier
when auto-summary is disabled. If anything goes wrong during the migration process, you can use the
show atm route command to debug the problem. After all the nodes have been moved into the child peer
group represented by the LGN, restore auto-summary to reduce the number of reachable address
prefixes advertised by the LGN.
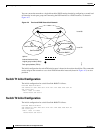
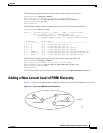
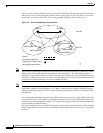
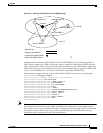
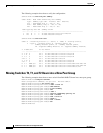
Figure A-5 shows the network topology after moving ATM switch router SanFran.BldA.T4 down into a
new peer group at level 72 and establishing an LGN representing that peer group at level 56.