


DEFINITY Enterprise Communications Server Release 8.2
Upgrades and Additions for R8r
555-233-115
Issue 1
April 2000
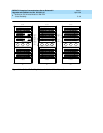
Multicarrier G2 Universal Module to R8r EPN
5-110Critical Reliability
5
Set Additional Administration
1. Type
list configuration software-version long
and press Enter to
compare the version number of the Release 8 software program
(displayed on the terminal) with the version number (written on a label on
the processor’s faceplate). If the version numbers are not the same,
change the version number on the processor label so that they agree.
2. Type
change system-parameters customer-options
and press
Enter.
Use this screen to enable the G3 V6 option and to assign the customer’s
other right-to-use options on the Release 8 upgrade order. See
DEFINITY
Enterprise Communications Server Release 8 Administrator’s Guide
, for
details on enabling these options.
3. Type
change site-data
and press
Enter. Use this screen to assign
system-specific information (such as building, floor, stations, and so
forth).
4. Type
status system 1
and press
Enter to verify that the system is in the
“active/standby” mode.
5. Type
save translation
and press
Enter. This instructs the system to write all
translation information from memory to the translation cards.
!
WARNING:
If the terminal screen displays “translation corruption detected; call
Lucent Technologies distributor immediately”, an error was detected
in the translations. Call your Lucent Technologies representative.
Close Upgraded EPN Cabinet and Reconnect
Cables
1. At the upgraded EPN, set the main circuit breaker to OFF.
NOTE:
Powering down an EPN without powering down the PPN will set off
alarms. However, these alarms should clear after power is restored
to each EPN.
2. Temporarily disconnect the lightwave transceivers and fiber optic cables
from the appropriate carriers.
3. Replace the back doors or back panels previously removed.
4. At the EPN cabinet, reconnect the lightwave transceivers, fiber optic
cables, and the connector cables associated with the carrier being
replaced.
5. Install the front door on the EPN cabinet.