


DEFINITY Enterprise Communications Server Release 8.2
Upgrades and Additions for R8r
555-233-115
Issue 1
April 2000
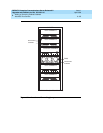
Adding or Removing Cabinet Hardware
6-131Add MCC Port Carriers
6
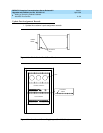
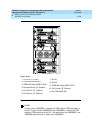
10. Install a 631AR, 631WA1, 631DA1, or 644A power unit in the leftmost slot
and a 631BR, 631WB1, 631DB1, 645B, or 649A power unit in the
right-most slot of installed port carrier as follows:
a. Set the circuit breaker on the power unit to be added to OFF.
b. Move locking slide on power unit to its leftmost position and open
the lever.
c. Align and slide the power unit into slot in the carrier until some
resistance is felt.
d. Lift the locking lever upward until it latches.
e. Move the locking slide on power unit to its rightmost position.
f. Connect a power cord inside the cabinet to the outlet on the power
unit.
g. Set the circuit breaker on the power unit to ON.
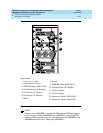
11. Install a TN736 power converter in the slot next to the 631AR power
converter or a TN752 power converter in the slot next to the 631WA1
power converter on the left side of the carrier.
NOTE:
The TN736 is not required when the 631DB1 power unit is used in
the J58890B-2 or J58890B-3 port carriers. It is required in the
J58890B-1 port carrier regardless of which 631 power unit is
provided. Use the TN752 or TN755B if the system is equipped with
neon message waiting.
12. Install the port circuit packs in the carrier.
13. Connect the AC/DC power cords located inside the cabinet to the power
units.
14. Install the rear panels around the port carrier.
15. Install cables from the port carrier to the MDF.
16. Install the cable access panel, as required.
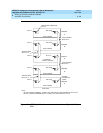
Reseat DEFINITY LAN Gateway System
1. Reseat the LAN Gateway assembly into its backplane connectors in the
carrier.
Reseat DEFINITY AUDIX System
1. Reseat the AUDIX assembly into its backplane connectors.