


4-18
Cisco PGW 2200 Softswitch Release 9.8 Software Installation and Configuration Guide
OL-18083-01
Chapter 4 Configuring the Cisco PGW 2200 Softswitch Software
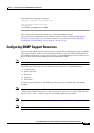
Configuring SNMP Support Resources
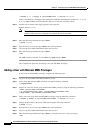
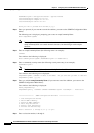
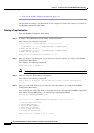
ReadAndNotifyToAll usm ApplicationsView - ApplicationsView
CiscoInternalSignal snmpv1 All All All
CiscoInternalSignal snmpv2c All All All
CiscoInternalSignal usm All All All
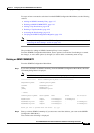
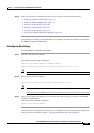
Would you like to proceed with the Add [n]/[y]?
Step 3 Enter y to proceed (if you enter n to cancel the addition, you return to the SNMPD Configuration Main
Menu).
The following text is displayed, prompting you to enter an snmpCommunityName.
Enter snmpCommunityName:
Note The snmpCommunityName should be at least three characters in length. The
snmpCommunityName can contain numeric characters, but should begin with an alpha
character.
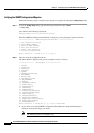
Step 4 Enter an snmpCommunityName (the following name is an example):
comname1
Text similar to the following is displayed:
Enter CommunitySecurityName (ReadAndNotifyToAll or ReadWriteAll):
Step 5 Enter a community security name (the following security name entry is an example):
ReadAndNotifyToAll
Note The CommunitySecurityName (ReadAndNotifyToAll or ReadWriteAll) is case sensitive.
Text similar to the following text is displayed:
snmpCommunityName: comname1 is about to be added. Are you sure that you want to add this
snmpCommunity Name [y]/[n]?
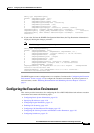
Step 6 Enter y to add the snmpCommunityName (if you enter n to cancel the addition, you return to the
SNMPD Configuration Main Menu):
Text similar to the following is displayed:
Adding snmpCommunity:
snmpCommunityEntry Icomname1 comname1 ReadAndNotifyToAll localSnmpID - - nonVolatile
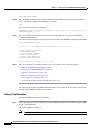
=================== SNMPD Configuration Main Menu ===================
1. View Configuration Entries
2. Add an SNMP Community
3. Delete an SNMP Community
4. Add a Trap Destination
5. Delete a Trap Destination
6. Activate the New Settings
Enter a selection (1 through 6) or 'q' to quit:
Step 7 Enter a selection number, 1 through 6.