


2-13
Cisco PGW 2200 Softswitch Release 9.8 Software Installation and Configuration Guide
OL-18083-01
Chapter 2 Installing the Sun Solaris 10 Operating System
Loading the Sun Solaris 10 Operating System
Installing the Sun Solaris 10 Operating System for Opteron-based Platforms
The instructions in this section were written to correspond with the instructions in the Cisco Solaris 10
Operating System Startup Disk for Opteron-based Platforms. Other Solaris installations are similar, with
slight variations. These instructions will note the differences between the sets of installation instructions.
Step 1 Choose one of the following options to connect the Cisco PGW 2200 Softswitch:
• Connect to the Cisco PGW 2200 Softswitch through a console port.
• Connect a keyboard and monitor to the Cisco PGW 2200 Softswitch.
Note Cisco recommends that you connect to the Cisco PGW 2200 Softswitch using a keyboard and monitor.
If you choose to connect through the console port, you need to ensure that Console Redirection is
enabled as instructed in Step 6.
Step 2 Follow these steps to connect to the target system through a serial port:
a. Log in to the SP (Service Processor) as an Administrator:
login: root
password: changeme
b. Type the following command to start the ILOM Service Processor (SP) GUI:
start /SP/console
Step 3 This step is optional—if you decide to skip this, go to Step 4.
a. Place the system in single-user mode by shutting down the standby machine.
b. When the machine prompts for a password, type either ^ -d to proceed with normal startup, or the
root password for system maintenance.
Step 4 Load the appropriate version of the CD-ROM labeled Cisco Solaris 10 Operating Software Startup Disk
for Opteron-based Platforms into the CD-ROM drive.
Step 5 If the system is currently running, log in as root.
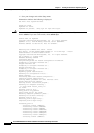
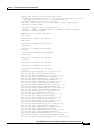
Step 6 Boot the system from the CD-ROM drive by entering the appropriate command:
# reboot
Note You may be prompted during the reboot to enter Ctrl-B or Ctrl-C to open configuration tools for your
hardware. You do not need to open any of these tools to complete this installation.
Perform the following steps once the reboot starts:
a. Press the F2 key to open the Setup menu. The Setup menu opens after the self-tests have been
completed.
b. Go to the BOOT setup information.
c. Ensure that the CD-ROM is the first bootable device in the list.
d. Choose the Advanced menu from the category selections at the top of the screen.
e. If you connected to the Cisco PGW 2200 Softswitch using the console port, ensure Console
Redirection is set to enable or always.