


4-24
Cisco PGW 2200 Softswitch Release 9.8 Software Installation and Configuration Guide
OL-18083-01
Chapter 4 Configuring the Cisco PGW 2200 Softswitch Software
Configuring SNMP Support Resources
Verifying the SNMP Configuration Migration
Perform the following steps to verify that your changes were applied by running the config-snmp utility:
Step 1 To start the config-snmp utility, type the following command and press Enter:
# config-snmp
Text similar to the following is displayed:
Migrating snmpd.cnf into a more secure setting...
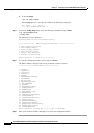
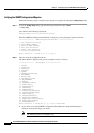
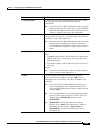
When the SNMPD Configuration Main Menu is displayed, you are prompted to make a selection:
=================== SNMPD Configuration Main Menu ===================
1. View Configuration Entries
2. Add an SNMP Community
3. Delete an SNMP Community
4. Add a Trap Destination
5. Delete a Trap Destination
6. Activate the New Settings
Enter a selection (1 through 6) or 'q' to quit: 1
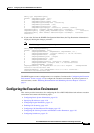
Step 2 Enter 1 to view the configuration entries.
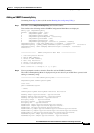
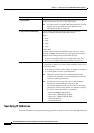
The Entries Menu is displayed and you are prompted to make a selection:
=================== Entries Menu ===================
1. sysDescr
2. sysObjectID
3. sysLocation
4. sysContact
5. sysName
6. snmpEnableAuthenTraps
7. MAX_THREADS
8. MAX_PDU_TIME
9. MAX_OUTPUT_WAITING
10. MAX_SUBAGENTS
11. subagent
12. snmpCommunityEntry
13. communityEntry
14. snmpEngineBoots
15. usmUserEntry
16. vacmAccessEntry
17. vacmSecurityToGroupEntry
18. vacmViewTreeFamilyEntry
19. snmpNotifyEntry
20. snmpTargetAddrEntry
21. snmpTargetParamsEntry
22. snmpNotifyFilterProfileEntry
23. snmpNotifyFilterEntry
24. httpUserNameEntry
Enter a selection (1 through 24) or 'q' to quit to Main Menu:
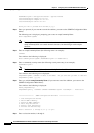
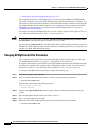
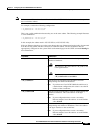
a. If you select 12 from the SNMPD Configuration Main Menu, the snmpCommunityEntry is
displayed, showing the changes you made:
Note The following entries are examples only.