


4-22
Cisco PGW 2200 Softswitch Release 9.8 Software Installation and Configuration Guide
OL-18083-01
Chapter 4 Configuring the Cisco PGW 2200 Softswitch Software
Configuring SNMP Support Resources
• Verifying the SNMP Configuration Migration, page 4-24
The procedure for adding a Trap Destination is now complete. Proceed to the selection you entered in
the SNMPD Configuration Main Menu.
Deleting a Trap Destination
From the SNMPD Configuration Main Menu:
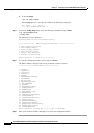
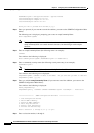
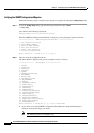
Step 1 To delete a Trap Destination, enter 5 (Delete a Trap Destination):
Text similar to the following is displayed:
=================== Delete Trap Menu ===================
1. TargetAddress: 7.7.7.7:0 , TargetAddrParams: v1ExampleParams ,
IP Mask: 255.255.255.255:0
2. TargetAddress: 6.6.6.6:0 , TargetAddrParams: v1ExampleParams ,
IP Mask: 255.255.255.255:0
Would you like to proceed with the Delete [n]/[y]?
Step 2 Enter y to delete a Trap Destination (if you enter n to cancel the deletion, you return to the SNMPD
Configuration Main Menu):
Text similar to the following is displayed:
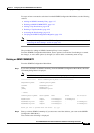
Enter a selection (1 through 2):
Note The Target Addresses (1 through 2) shown above are examples only.
Step 3 Enter 1 to select the TargetAddress to be deleted:
Text similar to the following is displayed:
Trap is about to be deleted. Are you sure that you want to delete this Trap Entry
[n]/[y]?
Step 4 Enter y to confirm the deletion (if you enter n to cancel the deletion, you return to the SNMPD
Configuration Main Menu).
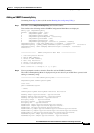
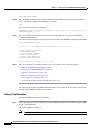
Text confirming the deleted Trap Entry is displayed and you are returned to the SNMPD Configuration
Main Menu. Note that 483 (below) is an internal Trap snmpTargetAddrName.
Deleting Trap snmpTargetAddrName = 483
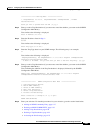
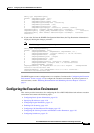
=================== SNMPD Configuration Main Menu ===================
1. View Configuration Entries
2. Add an SNMP Community
3. Delete an SNMP Community
4. Add a Trap Destination
5. Delete a Trap Destination
6. Activate the New Settings
Enter a selection (1 through 6) or 'q' to quit: