


4-92
Cisco PGW 2200 Softswitch Release 9.8 Software Installation and Configuration Guide
OL-18083-01
Chapter 4 Configuring the Cisco PGW 2200 Softswitch Software
Configuring the Data Dumper to Support Cisco BAMS
Step 8 Stop and start the newly-standby host (formerly active host).
Step 9 Repeat Step 3 and Step 4 for the version of dmprSink.dat stored in this directory.
Step 10 Change to the /opt/CiscoMGC/etc/active_link directory by entering the following UNIX command:
# cd /opt/CiscoMGC/etc/active_link/
Step 11 Repeat Step 3 and Step 4 for the version of dmprSink.dat stored in this directory.
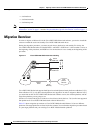
Step 12 Repeat Step 1 through Step 10 on this second Cisco PGW 2200 Softswitch if your system is equipped
with a second Cisco PGW 2200 Softswitch.
This completes the procedures for configuring the data dumper. If your system uses BAMS, continue to
the “Configuring the Data Dumper to Support Cisco BAMS” section on page 4-92. If you have questions
or need assistance, see the “Obtaining Documentation and Submitting a Service Request” section on
page x.
Configuring the Data Dumper to Support Cisco BAMS
If your system will use Cisco BAMS to retrieve CDRs from the Cisco PGW 2200 Softswitch, perform
the following procedure to configure the data dumper to support Cisco BAMS:
Step 1 Log into a Cisco PGW 2200 Softswitch as root if you are not already logged in.
Step 2 Change to the /opt/CiscoMGC/etc directory by entering the following UNIX command:
# cd /opt/CiscoMGC/etc
Step 3 Use a text editor, such as vi, to open and edit the dmprSink.dat file fields you want to change.
Step 4 Save your changes and exit the text editor.
Step 5 Change to the /opt/CiscoMGC/etc/CONFIG_LIB/new directory by entering the following UNIX
command:
# cd /opt/CiscoMGC/etc/CONFIG_LIB/new
Step 6 Stop and start the standby host.
Step 7 Perform sw-over on the active host.
Step 8 Stop and start the newly-standby host (formerly active host).
Step 9 Repeat Step 3 and Step 4 for the version of dmprSink.dat stored in this directory.
Step 10 Change to the /opt/CiscoMGC/etc/active_link directory by entering the following UNIX command:
# cd /opt/CiscoMGC/etc/active_link/
Step 11 Repeat Step 3 and Step 4 for the version of dmprSink.dat stored in this directory.
Step 12 Repeat Step 1 through Step 10 on this second Cisco PGW 2200 Softswitch if your system is equipped
with a second Cisco PGW 2200 Softswitch.
This completes the procedures for configuring the data dumper to support BAMS. If you have questions
or need assistance, see the “Obtaining Documentation and Submitting a Service Request” section on
page x.