


ColorQube™ 9201/9202/9203 Device Connection
System Administrator Guide 2-5
Ethernet Configuration
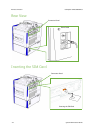
Ethernet Port
The Ethernet Interface is set to auto detect the speed of your network. The device supports the following
selectable speeds:
•Auto
•10Mbps Half-Duplex
• 10Mbps Full-Duplex
• 100 Mbps Half-Duplex
• 100 Mbps Full-Duplex
•1 Gbps Half-Duplex.
• 1 Gbps Full-Duplex
Note
If your network has hubs that have Auto-Sensing enabled and the device Ethernet speed is set to Auto, it
is possible that the hub will not arbitrate to the correct speed.
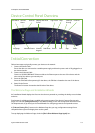
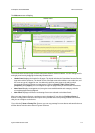
Setting the Ethernet speed at the device
1. Press the <Log In/Out> button to enter the Tools pathway.
2. Enter the Administrator’s User Name [admin], touch [Next], enter the Password [1111], then touch
[Enter].
3. Press the <Machine Status> button.
4. Touch [Tools].
5. Touch [Network Settings].
6. Touch [Advanced], if a warning message appears, touch [Continue].
7. Touch [Ethernet Physical Media].
8. Select the Speed to match the speed set on your hub or switch.
9. Touch [Save], touch [Close].
10. Press the <Log In/Out> button.
11. Touch [Confirm] to exit the Tools Pathway.
Enable TCP/IP and HTTP at the Device
Look at the Configuration Report, verify whether the addressing shown under TCP/IP Settings will enable this
device to communicate over your network. Also, verify that HTTP is enabled under HTTP Settings, to enable
use of the device's web user interface for network and options configuration. If necessary, reset TCP/IP
addressing (including DHCP and DNS settings) and enable HTTP as follows:
1. Go to the device and press the <Log In/Out> button to enter the Tools pathway.
2. Enter the Administrator’s User Name [admin], touch [Next], enter the Password [1111], then touch
[Enter].
Tip: This password can be changed by following the steps provided in the Administrator Tools topic in
the General Setup section of this guide.