123
[Connection and Setup of Position Control Mode]
Connection and Setup of
Position Control Mode
6A 0 to 100
<0>
2msSetup of
mechanical brake
action at stalling
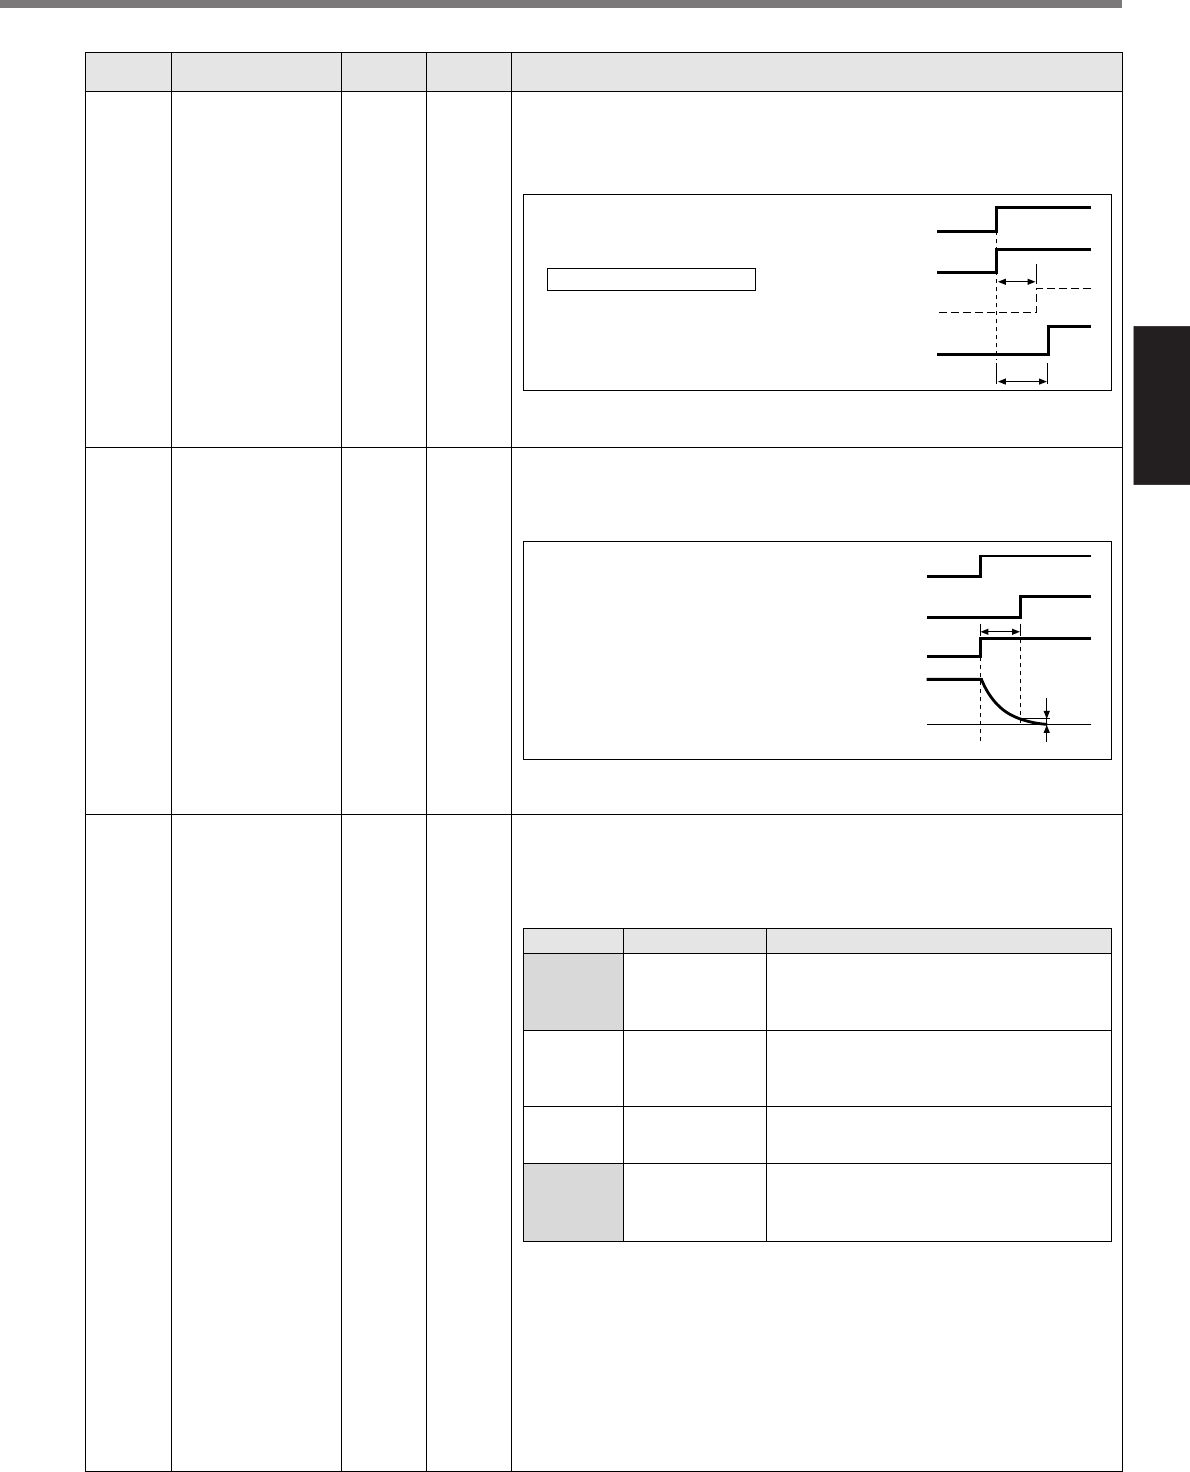
You can set up the time from when the brake release signal (BRK-OFF :
CN X5, Pin-10 and 11) turns off to when the motor is de-energized
(Servo-free), when the motor turns to Servo-OFF while the motor is at
stall.
Refer to P.44, "Timing Chart"-Servo-ON/OFF Action While the Motor Is at
Stall" of Preparation as well.
• Set up to prevent a micro-travel/
drop of the motor (work) due to the
action delay time (tb) of the brake
• After setting up Pr6a
>
=
tb ,
then compose the sequence so as
the driver turns to Servo-OFF after
the brake is actually activated.
ON
SRV-ON
BRK-OFF
actual brake
motor
energization
release
OFF
hold
release
energized
hold
non-
energized
Pr6A
tb
6B 0 to 100
<0>
2msSetup of
mechanical brake
action at running
You can set up time from when detecting the off of Servo-ON input signal
(SRV-ON : CN X5, Pin-29) is to when external brake release signal
(BRK-OFF : CN X5, Pin-10 and 11) turns off, while the motor turns to
servo off during the motor in motion.
Refer to P.45, "Timing Chart"-Servo-ON/OFF action while the motor is in
motion" of Preparation as well.
• Set up to prevent the brake
deterioration due to the motor
running.
• At Servo-OFF during the motor is
running, tb of the right fig. will be
a shorter one of either Pr6B
setup time, or time lapse till the
motor speed falls below 30r/min.
tb
ON
SRV-ON
BRK-OFF
motor
energization
release
OFF
hold
actual
brake
energized
non-
energized
30 r/min
6C
*
0 to 3
for
A, B-frame
<3>
for
C to F-frame
<0>
–Selection of
external
regenerative
resistor
With this parameter, you can select either to use the built-in regenerative
resistor of the driver, or to separate this built-in regenerative resistor and
externally install the regenerative resistor (between RB1 and RB2 of
Connector CN X2 in case of A to D-frame, between P and B2 of terminal
block in case of E, F-frame).
<Remarks>
Install an external protection such as thermal fuse when you use the
external regenerative resistor.
Otherwise, the regenerative resistor might be heated up abnormally and
result in burnout, regardless of validation or invalidation of regenerative
over-load protection.
<Caution>
When you use the built-in regenerative resistor, never to set up other
value than 0. Don't touch the external regenerative resistor.
External regenerative resistor gets very hot, and might cause burning.
Setup value
<0>
(C, D, E and
F-frame)
1
2
<3>
(A, B-frame)
Built-in resistor
External resistor
External resistor
No resistor
Regenerative processing circuit will be
activated and regenerative resistor overload
protection will be triggered according to the
built-in resistor (approx. 1% duty).
The driver trips due to regenerative overload
protection (Err18), when regenerative
processing circuit is activated and its active
ratio exceeds 10%,
Regenerative processing circuit is activated,
but no regenerative over-load protection is
triggered.
Both regenerative processing circuit and
regenerative protection are not activated, and
built-in capacitor handles all regenerative
power.
Standard default : < >
PrNo.
Setup
range
UnitTitle Function/Content
Regenerative resistor
to be used
Regenerative processing and
regenerative resistor overload


