


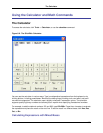


1. From the main menu, click Macro → Record Macro (or use one of the toggle methods to start record-
ing, as described under Recorded Macro Operations above).
2. Enter the keystrokes that you want to record. For example, to record a macro of the cursor moving
three spaces to the right, press the right arrow key three times. You can also change a configuration
option, view settings, or expand a code template during macro recording.
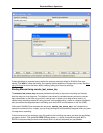
3. When you have finished recording the macro, end recording by clicking Macro → Stop Recording
Macro (or the same toggle you used in Step 1). The Save Macro Dialog is displayed.
Tip
For recorded macros you don’t need to track, perhaps for immediate or one-time use, SlickEdit
Core provides a way to stop macro recording and instantly bind the macro to a key sequence.
This allows you to keep a set of recent, unnamed macro recordings instead of having just one
"last recorded macro". See Binding Macros Using execute_last_macro_key for more information.
4. The next step depends on the purpose of your recorded macro. If you want to save the macro for fu-
ture use, continue with the steps below. If you’re just recording it to discover Slick-C® code (see Using
Macros to Discover and Control Options), click Edit (or press Alt+E) at this time to view the source
code. However, you will not be prompted to save the macro and bind it to a key sequence. In order to
do that, you will need to use Macro → Save last-macro prior to recording a new macro or exiting the
editor. See Saving and Editing Recorded Macros for more details.
5. Specify the name for the macro in the Macro Name text box.
6. Select the options that you want from the following, or leave the defaults if you aren’t sure:
• Requires editor control - Check this box if your macro can only operate if the target is an editor
control.
• Allow in read only mode - Check this box if your macro does not modify the current buffer.
• Allow when window is iconized - You will probably NOT want this box checked if your macro modi-
fies the current buffer. Whether to check this box is more a matter of personal taste.
• Allow in non-MDI editor control - Check this box if your macro should be allowed in a non-MDI ed-
itor control. This is typical for commands which require an editor control but do not open or close ed-
itor windows/buffers.
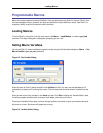
7. Click Save. The List Macros Dialog is displayed, from which you can run the macro, edit the source,
delete it, or choose to bind it to a key sequence. If you plan to use the macro often, it’s best to go
ahead and create a key binding for it now. See Binding Recorded Macros to Keys for more information.
Binding Recorded Macros to Keys
To use recorded macros most effectively, create key bindings for them so they can be executed quickly
when you want to use them. Macros can be bound through the Key Bindings dialog (see Binding Macros
Using the Key Bindings Dialog), or by using the instant "stop recording and bind" method associated with
Recorded Macro Operations
331