


On-Screen Display
Display Setup Examples
MN102H75K/F75K/85K/F85K LSI User Manual Panasonic Semiconductor Development Company
161
Panasonic
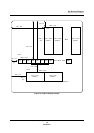
7.7 Display Setup Examples
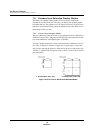
7.7.1 Setting Up the Graphics Layer
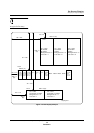
This section shows how to set up the graphics display data in the VRAM.
■
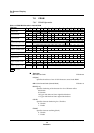
Register settings
RAMEND (x’007F04’) = x’80FF’ (Graphics RAM end address: x’980F’)
GIHP (x’007F16’) = x’0822’ (GIHP = x’22’, GIHSZ = x’1’)
GIVP (x’007F18’) = x’1803’ (GIVP = x’03’, GIVSZ = x’3’)
OSD2 (x’007F08’) = x’0047’ (1 line maximum = 18 tiles, 16-color mode,
graphics take priority)
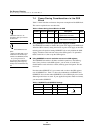
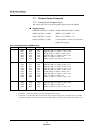
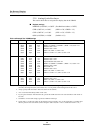
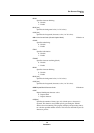
Table 7-5 Example Graphics VRAM Settings
Line No. RAM Addr. RAM Data Data Type Description
1 980E
980C
980A
9808
9806
9804
...
4000
4255
02AA
4100
C004
C040
...
GTC
GTC
GTC
GTC
GHP
GVP
Graphic tile, GCB = x’0’, GPRT = 0, GTC = x’000’
Graphic tile, GCB = x’0’, GPRT = 1, GTC = x’055’
Blank tile, GCB = x’0’, GPRT = 1, GTC = x’0AA’
Graphic tile, GCB = x’0’, GPRT = 0, GTC = x’100’
GHSZ = x’0’, GSHT = 0, GHP = x’04’
GLAST = 0, GVSZ = x’0’, GINT = 0, GVP = x’40’
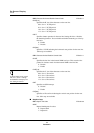
2 97E6
97E4
97E2
97E0
97DE
97DC
97DA
97D8
97D6
...
4010
4011
4012
4C13
4214
0815
4216
D810
C858
...
GTC
GTC
GTC
GTC
GTC
GTC
GTC
GHP
GVP
Graphic tile, GCB = x’0’, GPRT = 0, GTC = x’010’
Graphic tile, GCB = x’0’, GPRT = 0, GTC = x’011’
Graphic tile, GCB = x’0’, GPRT = 0, GTC = x’012’
Graphic tile, GCB = x’3’, GPRT = 0, GTC = x’013’
Graphic tile, GCB = x’0’, GPRT = 1, GTC = x’014’
Blank tile, GCB = x’2’, GPRT = 0, GTC = x’015’
Graphic tile, GCB = x’0’, GPRT = 1, GTC = x’016’
GHSZ = x’3’, GSHT = 0, GHP = x’10’
GLAST = 0, GVSZ = x’1’, GINT = 0, GVP = x’58’
3 97BE
97BC
97BA
97B8
...
4181
4382
C044
E020
...
GTC
GTC
GHP
GVP
Graphic tile, GCB = x’0’, GPRT = 0, GTC = x’181’
Graphic tile, GCB = x’0’, GPRT = 1, GTC = x’182’
GHSZ = x’0’, GSHT = 0, GHP = x’44’
GLAST = 1, GVSZ = x’0’, GINT = 0, GVP = x’20’
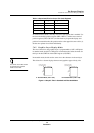
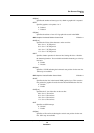
Notes: 1. Always specify GHP and GVP, in that order, at the end of each line.
2. Set GINT to 1 in the GVP setting to generate an OSD graphics interrupt.
3. Set GLAST to 1 in the GVP setting for the last line in the graphics display. Also, set the GVP value to a smaller
value than the position of the current line. (In the example in table 7-5, GVP = x’20’ is smaller than GVP = v’58’.)