


Formatter (previously installed in another printer)
replacement configuration
When the formatter PCB is being replaced with one that was installed in another printer, an
NVRAM initialization will need to be performed. Before doing an NVRAM INIT, print a
configuration page and a supplies status page in the INFORMATION menu to obtain the
page counts, counts for any of the supplies, serial number, and the born-on date. If a
configuration page and a supplies status page cannot be printed, this information can be
obtained from the Service menu prior to replacing the formatter or performing this action.
1. To perform an NVRAM initialization follow the procedure below.
2. Press and hold the
button after powering up until all LEDs are on, then release the
button.
3. Press the
button once and release.
4. Press Menu once and release. The list of choices will be displayed.
5. Press
or until NVRAM INIT is highlighted.
6. Press
to invoke an NVRAM INIT.
In addition, the Total Mono Pages, Total Color Pages, Serial Number, Service ID, Cold
Reset Paper (if needed), and the Fuser Kit Count will need to be reset using the service
menu. The Transfer Kit count will be unaffected by the replacement of a formatter.
To ensure optimum print quality, the printer will need to be calibrated by performing 3
Calibrate Now's using the printer control panel by selecting CONFIGURE DEVICE / PRINT
QUALITY / CALIBRATE NOW.
DC Controller (New) replacement configuration
To ensure optimum print quality, the printer will need to be calibrated by performing 3
Calibrate Now's using the printer control panel by selecting CONFIGURE DEVICE / PRINT
QUALITY / CALIBRATE NOW.
Light intensity of the media sensor must be adjusted. Follow the procedure below to adjust
the light intensity.
1. Turn the printer OFF.
2. Open the front cover.
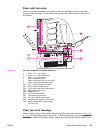
3. While pressing the engine test print switch on the left side of the printer (see
Figure
7-16. Location of solenoids and clutches), turn the printer ON.
4. Close the front cover.
5. Load plain white paper in the multipurpose tray.
6. As the printer goes into READY period, press the engine test print switch and test print.
7. One sheet of paper will be fed into the printer from the multipurpose tray and will be
delivered to the face-down delivery tray.
ENWW Replacement parts configuration 353