


In addition, the Total Mono Pages, Total Color Pages, Serial Number, Service ID, Cold
Reset Paper (if needed), and the Fuser Kit Count will need to be reset using the service
menu. The Transfer Kit count will be unaffected by the replacement of a formatter.
To ensure optimum print quality, the printer will need to be calibrated by performing 3
Calibrate Now's using the printer control panel by selecting Configure Device / PRINT
QUALITY / CALIBRATE NOW.
DC Controller (New) replacement configuration
To ensure optimum print quality, the printer will need to be calibrated by performing 3
Calibrate Now's using the printer control panel by selecting Configure Device / PRINT
QUALITY / CALIBRATE NOW.
Light intensity of the media sensor must be adjusted. Follow the procedure below to adjust
the light intensity.
1. Turn the printer OFF.
2. Open the front cover.
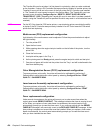
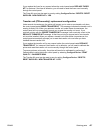
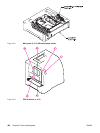
3. While pressing the engine test print switch on the left side of the printer (see
Figure
7-16. Location of solenoids and clutches), turn the printer ON.
4. Close the front cover.
5. Load plain white paper in the Tray 1.
6. As the printer goes into Ready period, press the engine test print switch and test print.
7. One sheet of paper will be fed into the printer from the Tray 1 and will be delivered to the
face-down delivery tray.
DC Controller (previously installed in another printer) replacement
configuration
To ensure optimum print quality, the printer needs to be calibrated by performing 3 Calibrate
Now's using the printer control panel by selecting Configure Device / PRINT QUALITY /
CALIBRATE NOW, see
Calibrate Now, in chapter 7.
Light intensity of the media sensor must be adjusted. Follow the procedure below to adjust
the light intensity.
1. Turn the printer OFF.
2. Open the front cover.
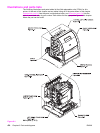
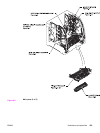
3. While pressing the engine test print switch on the left side of the printer (see
Figure
7-16. Location of solenoids and clutches), turn the printer ON.
4. Close the front cover.
5. Load plain white paper in the Tray 1.
6. As the printer goes into Ready period, press the engine test print switch and test print.
7. One sheet of paper will be fed into the printer from the Tray 1 and will be delivered to the
face-down delivery tray.
ENWW Ordering parts 475