


Functional Overview
CTS 710 SONET Test Set User Manual
2–15
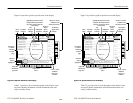
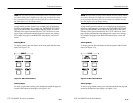
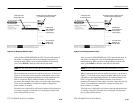
Connecting SONET Electrical Signals
To connect SONET electrical signals to the CTS 710:
1. Connect the transmit end of the signal cable to the RECEIVE
connector on the CTS 710.
2. Connect the receive end of the signal cable to the TRANSMIT
connector on the CTS 710.
Connecting DS1/DS3 Electrical Signals
To connect DS1/DS3 electrical signals to the CTS 710:
1. Connect the transmit end of the signal cable to the IN connector
for the appropriate rate on the CTS 710.
2. Connect the receive end of the signal cable to the OUT connector
for the appropriate rate on the CTS 710.
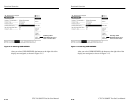
Initiating Autoscan
Autoscan is a feature that automatically scans the received signal and
changes the CTS 710 receive settings to match the received signal.
Autoscan is the quickest way to set up the CTS 710 to view a signal.
To initiate autoscan, press the AUTOSCAN front-panel button. For
detailed information on the AUTOSCAN function, see Checking
Signal Status on page 3–55.
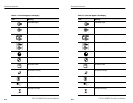
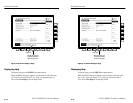
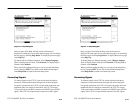
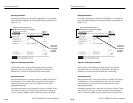
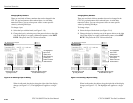
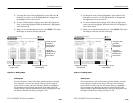
Changing Parameters
Most of the menu pages in the CTS 710 contain parameters (or
settings) that you can change. The choices available for a parameter
appear in four ways (examples in parentheses):
H As a list (Test Pattern: PRBS 2^23–1, PRBS 2^20–1, ...)
H As a decimal number (Frequency Offset: 74.3 ppm)
H As a binary number (Z1 Byte: 10101111)
H As a text string (File Name: TEST_34)
Functional Overview
CTS 710 SONET Test Set User Manual
2–15
Connecting SONET Electrical Signals
To connect SONET electrical signals to the CTS 710:
1. Connect the transmit end of the signal cable to the RECEIVE
connector on the CTS 710.
2. Connect the receive end of the signal cable to the TRANSMIT
connector on the CTS 710.
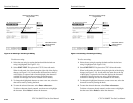
Connecting DS1/DS3 Electrical Signals
To connect DS1/DS3 electrical signals to the CTS 710:
1. Connect the transmit end of the signal cable to the IN connector
for the appropriate rate on the CTS 710.
2. Connect the receive end of the signal cable to the OUT connector
for the appropriate rate on the CTS 710.
Initiating Autoscan
Autoscan is a feature that automatically scans the received signal and
changes the CTS 710 receive settings to match the received signal.
Autoscan is the quickest way to set up the CTS 710 to view a signal.
To initiate autoscan, press the AUTOSCAN front-panel button. For
detailed information on the AUTOSCAN function, see Checking
Signal Status on page 3–55.
Changing Parameters
Most of the menu pages in the CTS 710 contain parameters (or
settings) that you can change. The choices available for a parameter
appear in four ways (examples in parentheses):
H As a list (Test Pattern: PRBS 2^23–1, PRBS 2^20–1, ...)
H As a decimal number (Frequency Offset: 74.3 ppm)
H As a binary number (Z1 Byte: 10101111)
H As a text string (File Name: TEST_34)