


5700A/5720A Series II Calibrator
Service Manual
4-4
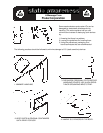
4-3. General Cleaning
To keep the Calibrator looking like new, clean the case, front panel keys, and lens using
a soft cloth slightly dampened with water or a non-abrasive mild cleaning solution that
does not harm plastics.
CAUTION
Do not use aromatic hydrocarbons or chlorinated solvents for
cleaning. They can damage the plastic materials used in the
calibrator.
4-4. Cleaning PCA’s
Printed circuit assemblies only need cleaning after repair work. After soldering on a pca,
remove flux residue using isopropyl alcohol and a cotton swab.
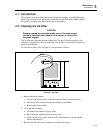
4-5. Access Procedures
WARNING
Servicing described in this section is to be performed by
qualified service personnel only. To avoid electrical shock, do
not perform any servicing unless qualified to do so.
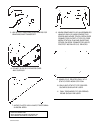
4-6. Top and Bottom Covers
Check that power is not connected to the Calibrator; the power control must be off, and
the line power cord must be disconnected. Top and bottom covers are each secured with
eight Phillips head screws (four front, four rear).
4-7. Digital Section Cover
The Digital Section is accessed through one top cover that is secured by six Phillips head
screws.
4-8. Analog Section Covers
The Analog Section is enclosed with separate covers on top and bottom. The top cover is
secured with seven Phillips head screws. The bottom Analog Section cover is secured
with eight Phillips head screws (three short, five longer).
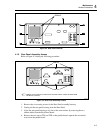
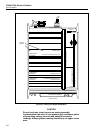
4-9. Rear Panel Removal and Installation
Detach the Rear Panel by removing the six hex head screws (three on each rear handle
side) and the two Phillips head screws found along the side of the Fan Assembly. Refer
to Figure 4-2 for screw locations.