


Troubleshooting
Component-level Troubleshooting
5
5-73
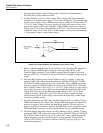
4. Next, jumper the input of the SUMMING AMPLIFIER to the -5S supply and check
the following:
• TP5: positive voltage
• TP4: negative voltage
• TP3: positive voltage
• Pin 6 of U8: positive voltage
5. Repair any amplifier circuits which are not properly inverting. Reinstall feedback
resistor R6. If the 100 Hz oscillation is still not present, check rectifying diodes
CR1-CR4 and the summing resistors in Z6. The output of Z6 is summed with the -
12V reference by R42 and R43. Check the ERROR INTEGRATOR circuit by
making sure opamp U18 is inverting. If it is not, check U18 and its associated
circuitry. If U18 is inverting properly, the problem is probably due to the
MULTIPLIER U16 or its associated components.
6. Check INT OSC OUT for correct oscillation at each frequency range. Connect an
oscilloscope to TP3 (common to TP1). Set the Calibrator for 2V at 100 Hz, 1 kHz,
10 kHz, 100 kHz, and 1 MHz. If any of the frequency ranges are bad (i.e., no
oscillation or oscillation at the wrong frequency range or wrong voltage) check
relays K1, K2, K3, their associated drive circuits, and the amplifier feedback
capacitors that these relays select.
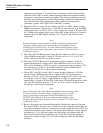
7. Check INT OSC OUT for correct frequency oscillation within a frequency range.
Connect a frequency counter to TP3 (common to TP1). Set the Calibrator for 2V at 5
kHz, operate. Check each frequency digitusing the edit knob. If a failure is detected,
check the FREQ DATA bus D1-D7 (D0 is only used during external phase lock) by
editing the frequency and seeing that each bit toggles between +5V and ground. If
each bit of the FREQ DATA bus is toggling properly the problem is probably due to
resistive DACs U5 and/or U7. If a failure with the FREQ DATA bus is detected,
U32 is probably at fault.
8. Check the 2.2V range output of the Oscillator. Set the Calibrator for 2V at 1 kHz,
operate. Measure the output at TP2 (common to TP1) for an undistorted sine wave of
2V (±50 mV) at 1 kHz with no offset. If the output is incorrect perform the resistor
check as follows:
a. Move switch S1 to the test position (to the left).
b. Measure the voltage drop across R87. It should be 1V ±20%. If this voltage is
incorrect, the 10 mA current source on the Oscillator Wideband SMD (A13A1)
assembly if probably at fault.
c. Verify that the voltage at TP2 is about +3.2V ±0.3V. If this voltage is incorrect,
the output stage circuit is probably at fault. If this voltage is correct the
Oscillator Wideband SMD (A13A1) assembly is probably at fault.
d. Return the switch to the operate position (move to the right).
9. Check the amplitude control within the 2.2V range. Set the Calibrator for 1V at 1
kHz, operate. Edit the amplitude digits and verify the output changes accordingly. If
a problem is detected, edit the output digits again and check each bit (A0-A7) of the
AMPL DATA bus to ensure they toggle between +5V and ground. If they do not,
U12 is probably faulty. If the AMPL DATA bus is operating, the resistive DAC U11
is probably at fault.
10. Check the 22V range output of the Oscillator. Set the Calibrator for 20V at 1 kHz,
operate. Check the output at TP2 (common to TP1) for an undistorted sine wave of
20±0.5V at 1 kHz. If the output is incorrect, check range setting relay K4 and its
associated resistor.