


Creating and executing SQL statements
94 DataWindow .NET
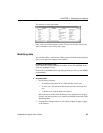
2 Double-click the appropriate icon to select the statement type.
The Select Table dialog box displays.
3 Select the table(s) you will reference in the SQL statement.
You go to the Select, Insert, Update, or Delete painter, depending on the
type of SQL statement you are pasting. The Insert, Update, and Delete
painters are similar to the Select painter, but only the appropriate tabs
display in the SQL toolbox at the bottom of the workspace.
For more information about the Select painter, see “Selecting a data
source” on page 110.
4 Do one of the following:
•For a
SELECT statement, define the statement exactly as in the Select
painter when building a view.
You choose the columns to select. You can define computed columns,
specify sorting and joining criteria, and
WHERE, GROUP BY, and
HAVING criteria. For more information, see “Working with database
views” on page 81.
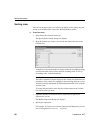
•For an
INSERT statement, type the values to insert into each column.
You can insert as many rows as you want.
•For an
UPDATE statement, specify the new values for the columns in
the Update Column Values dialog box. Then specify the
WHERE
criteria to indicate which rows to update.
•For a
DELETE statement, specify the WHERE criteria to indicate
which rows to delete.
5 When you have finished painting the SQL statement, click the Return
button in the PainterBar in the Select, Insert, Update, or Delete painter.
You return to the Database painter with the SQL statement pasted into the
ISQL view.
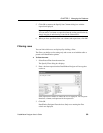
Typing SQL
Rather than paste, you can simply type one or more SQL statements directly in
the ISQL view.
You can enter most statements supported by your DBMS, including statements
you can paint as well as statements you cannot paint, such as a database stored
procedure or
CREATE TRIGGER statement. You cannot enter certain
statements that could destabilize the DataWindow Designer development
environment. These include the
SET statement and the USE database
statement.