


Disaster Recovery
One Button Disaster Recovery of a Windows System
Chapter 10476
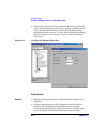
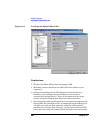
2. Click Tasks navigation tab and check One Button Disaster
Recovery Wizard in the Scoping Pane.
3. From the drop-down list in the Results Area, select the client for
which you would like to perform OBDR backup and click Next.
4. All critical objects are already selected (including the IDB in case of
the Cell Manager OBDR backup) and can not be deselected. Manually
select any other partitions you want to keep, because during the
recovery procedure, Data Protector deletes all partitions from your
system. Click Next.
5. Select the locally attached OBDR device you are going to use for
backup and click Next.
6. Select backup options. See “Using Backup Options” on page 225 for
details.
7. Click Next to proceed to the Scheduler page, which can be used to
schedule the backup. See “Scheduling Unattended Backups” on
page 207 for more information.
8. Click Next to display the Backup Object Summary page, in which you
can review the backup options.
NOTE In the Summary page, you cannot change a previously selected backup
device or the order in which the backup specifications follow one another
(move up and move down functionalities are not available). Only OBDR
non-essential backup objects can be deleted as well as general object
properties can be viewed.
However, a backup object’s description can be changed.
9. In the final page of the Backup wizard, you can save the backup
specification, start the interactive backup, or preview the backup.
It is recommended to save the backup specification so that you can
schedule or modify it later.
Modifying an
OBDR Backup
Specification
Once a backup specification is saved, you can edit it. Right-click the
backup specification and select Properties. You are offered to treat
the modified backup specification as a standard Data Protector
backup specification or as an OBDR backup specification. Save it as