


10-16
Cisco ASDM User Guide
OL-16647-01
Chapter 10 Configuring Security Contexts
Configuring Security Contexts
–
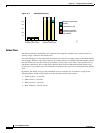
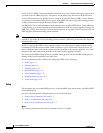
Peak (#)—Shows the peak number of xlates since the statistics were last cleared, either using
the clear resource usage command or because the device rebooted.
• NATs—Shows the number of NAT rules.
–
Context—Shows the name of each context.
–
NATs (#)—Shows the current number of NAT rules.
–
NATs (%)—Shows the NAT rules used by this context as a percentage of the total number of
NAT rules used by all contexts.
–
Peak NATs (#)—Shows the peak number of NAT rules since the statistics were last cleared,
either using the clear resource usage command or because the device rebooted.
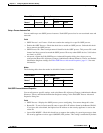
• Syslogs—Shows the rate of system log messages.
–
Context—Shows the name of each context.
–
Syslog Rate (#/sec)—Shows the current rate of system log messages.
–
Syslog Rate (%)—Shows the system log messages generated by this context as a percentage of
the total number of system log messages generated by all contexts.
–
Peak Syslog Rate (#/sec)—Shows the peak rate of system log messages since the statistics were
last cleared, either using the clear resource usage command or because the device rebooted.
Step 4 Click Refresh to refresh the view.
Configuring Security Contexts
This section describes how to add security contexts, and includes the following topics:
• Adding a Security Context, page 10-16
• Automatically Assigning MAC Addresses, page 10-17
For more information about security contexts, see the “Security Context Overview” section on
page 10-1.
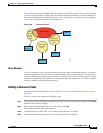
Adding a Security Context
For more information about security contexts, see the “Security Context Overview” section on
page 10-1.
To add a security context, perform the following steps:
Step 1 If you are not already in the System configuration mode, in the Device List pane, double-click System
under the active device IP address.
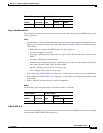
Step 2 On the Context Management > Security Contexts pane, click Add.
The Add Context dialog box appears.
Step 3 In the Security Context field, enter the context name as a string up to 32 characters long.
This name is case sensitive, so you can have two contexts named “customerA” and “CustomerA,” for
example. “System” or “Null” (in upper or lower case letters) are reserved names, and cannot be used.
Step 4 In the Interface Allocation area, click the Add button to assign an interface to the context.