


19-20
Cisco ASDM User Guide
OL-16647-01
Chapter 19 Adding Global Objects
TLS Proxy Wizard
Adding a TLS Proxy Instance
Note This feature is not supported for ASDM version 6.1.5 or the Adaptive Security Appliance version 8.1.2.
Use the Add TLS Proxy Instance Wizard to add a TLS Proxy to enable inspection of SSL encrypted VoIP
signaling, namely Skinny and SIP, interacting with Cisco Call Manager and to support the Cisco Unified
Communications features on the security appliance. For a detailed overview of the TLS Proxy used by
these features, see TLS Proxy Wizard, page 19-17.
This wizard is available from the Configuration > Firewall > Advanced > Encrypted Traffic Inspection
> TLS Proxy pane.
Step 1 Open the Configuration > Firewall > Advanced > Encrypted Traffic Inspection > TLS Proxy pane.
Step 2 To add a new TLS Proxy Instance, click Add.
The Add TLS Proxy Instance Wizard opens.
Step 3 In the TLS Proxy Name field, type the TLS Proxy name.
Step 4 Click Next.
The Add TLS Proxy Instance Wizard – Server Configuration dialog box opens. In this step of the wizard,
configure the server proxy parameters for original TLS Server—the Cisco Unified Call Manager
(CUCM) server, the Cisco Unified Presence Server (CUPS), or the Cisco Unified Mobility Advantage
(CUMA) server. See Add TLS Proxy Instance Wizard – Server Configuration, page 19-21.
After configuring the server proxy parameters, the wizard guides you through configuring client proxy
parameters (see Add TLS Proxy Instance Wizard – Client Configuration, page 19-22) and provides
instructions on the steps to complete outside the ASDM to make the TLS Proxy fully functional (see Add
TLS Proxy Instance Wizard – Other Steps, page 19-24).
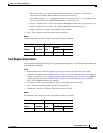
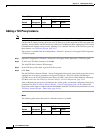
Modes
The following table shows the modes in which this feature is available:
Firewall Mode Security Context
Routed Transparent Single
Multiple
Context System
• • • •—
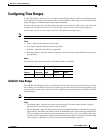
Firewall Mode Security Context
Routed Transparent Single
Multiple
Context System
• • • •—