


12-17
Cisco ASDM User Guide
OL-16647-01
Chapter 12 Configuring Multicast Routing
PIM
Restrictions
• You cannot use the same RP address twice.
• You cannot specify All Groups for more than one RP.
Fields
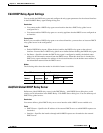
• Rendezvous Point IP Address—Enter the IP address of the RP. This is a unicast address. When
editing an existing RP entry, you cannot change this value.
• Use bi-directional forwarding—Check this check box if you want the specified multicast groups to
operation in bidirectional mode. In bidirectional mode, if the security appliance receives a multicast
packet and has no directly connected members or PIM neighbors present, it sends a Prune message
back to the source. Uncheck this check box if you want the specified multicast groups to operate in
sparse mode.
Note The security appliance always advertises the bidir capability in the PIM hello messages
regardless of the actual bidir configuration.
• Use this RP for All Multicast Groups—Choose this option to use the specified RP for all multicast
groups on the interface.
• Use this RP for the Multicast Groups as specified below—Choose this option to designate the
multicast groups to use with specified RP.
• Multicast Groups—Displays the multicast groups associated with the specified RP.
The table entries are processed from the top down. You can create an RP entry that includes a range
of multicast groups but excludes specific groups within that range by placing deny rules for the
specific groups at the top of the table and the permit rule for the range of multicast groups below the
deny statements.
Double-click an entry to open the Multicast Group dialog box for the selected entry.
–
Action—Displays “Permit” if the multicast group is included or “deny” if the multicast group
is excluded.
–
Multicast Group Address—Displays the address of the multicast group.
–
Netmask—Displays the network mask of the multicast group address.
• Insert Before—Opens the Multicast Group dialog box. Use this button to add a new multicast group
entry before the selected entry in the table.
• Insert After—Opens the Multicast Group dialog box. Use this button to add a new multicast group
entry after the selected entry in the table.
• Add—Opens the Multicast Group dialog box. Use this button to add a new multicast group entry at
the bottom of the table.
• Edit—Opens the Multicast Group dialog box. Use this button to change the information for the
selected multicast group entry.
• Delete—Removes the selected multicast group entry from the table.
Modes
The following table shows the modes in which this feature is available: