


11-42
Cisco ASDM User Guide
OL-16647-01
Chapter 11 Configuring Dynamic And Static Routing
Static Routes
Configuring Static Route Tracking
This procedure provides an overview of configuring static route tracking. For specific information about
the various fields used to configure this feature, see Field Information for Static Routes, page 11-42.
To configure tracking for a static route, perform the following steps:
Step 1 Choose a target of interest. Make sure the target responds to echo requests.
Step 2 Open the Static Routes page. Go to Configuration > Routing > Static Routes.
Step 3 Click Add to configure a static route that is to be used based on the availability of your selected target
of interest. You must enter the Interface, IP Address, Mask, Gateway, and Metric for this route. See
Add/Edit Static Route, page 11-43, for more information about these fields.
Step 4 Choose Tracked in the Options area for this route.
Step 5 Configure the tracking properties. You must enter a unique Track ID, a unique SLA ID, and the IP
address of your target of interest. See Add/Edit Static Route, page 11-43, for more information about
these fields.
Step 6 (Optional) To configure the monitoring properties, click Monitoring Options in the Add Static Route
dialog box. See Route Monitoring Options, page 11-44, for more information about the monitoring
properties.
Step 7 Click OK to save your changes.
The monitoring process begins as soon as you save the tracked route.
Step 8 Create a secondary route. The secondary route is a static route to the same destination as the tracked
route, but through a different interface or gateway. You must assign this route a higher administrative
distance (metric) than your tracked route.
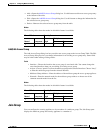
Field Information for Static Routes
For information about a specific pane, see the following topics:
• Static Routes, page 11-42
• Add/Edit Static Route, page 11-43
• Route Monitoring Options, page 11-44
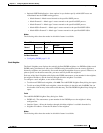
Static Routes
The Static Route pane lets you create static routes that will access networks connected to a router on any
interface. To enter a default route, set the IP address and mask to 0.0.0.0, or the shortened form of 0.
If an IP address from one security appliance interface is used as the gateway IP address, the security
appliance will ARP the designated IP address in the packet instead of ARPing the gateway IP address.
Leave the Metric at the default of 1 unless you are sure of the number of hops to the gateway router.
Fields
The Static Route pane shows the Static Route table: