


21-28
Cisco ASDM User Guide
OL-16647-01
Chapter 21 Configuring NAT
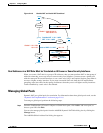
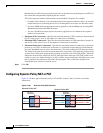
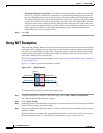
Using Static NAT
Step 1 From the Configuration > Firewall > NAT Rules pane, choose Add > Add Static NAT Rule.
The Add Static NAT Rule dialog box appears.
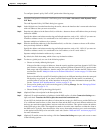
Step 2 In the Original area, from the Interface drop-down list, choose the interface that is connected to the hosts
with real addresses that you want to translate.
Step 3 Enter the real addresses in the Source field, or click the ... button to choose an IP address that you already
defined in ASDM.
Specify the address and subnet mask using prefix/length notation, such as 10.1.1.0/24. If you enter an
IP address without a mask, it is considered to be a host address, even if it ends with a 0.
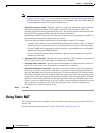
Step 4 In the Translated area, from the Interface drop-down list, choose the interface where you want to use the
mapped addresses.
Step 5 Specify the mapped IP address by clicking one of the following:
• Use IP Address
Enter the IP address or click the ... button to choose an IP address that you already defined in ASDM.
Specify the address and subnet mask using prefix/length notation, such as 10.1.1.0/24. If you enter
an IP address without a mask, it is considered to be a host address, even if it ends with a 0.
• Use Interface IP Address
The real and mapped addresses must have the same subnet mask.
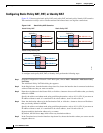
Note For identity NAT, enter the same IP address in the Original and Translated fields.
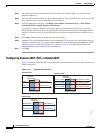
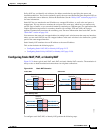
Step 6 (Optional) To use static PAT, check Enable Port Address Translation (PAT).
a. For the Protocol, click TCP or UDP.
b. In the Original Port field, enter the real port number.
c. In the Translated Port field, enter the mapped port number.
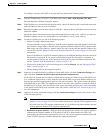
Step 7 (Optional) To enable translation of addresses inside DNS replies, click the Connection Settings area
open, and check Translate the DNS replies that match the translation rule.
If your NAT rule includes the real address of a host that has an entry in a DNS server, and the DNS server
is on a different interface from a client, then the client and the DNS server need different addresses for
the host; one needs the mapped address and one needs the real address. This option rewrites the address
in the DNS reply to the client. The mapped host needs to be on the same interface as either the client or
the DNS server. See the “DNS and NAT” section on page 21-13 for more information.
Step 8 (Optional) To enable connection settings, click the Connection Settings area open, and set one or more
of the following options:
Note You can also set these values using a security policy rule (see the “Configuring Connection
Settings” section on page 27-6). If you set them in both places, then the security appliance uses
the lower limit. For TCP sequence randomization, if it is disabled using either method, then the
security appliance disables TCP sequence randomization.
• Randomize sequence number—With this check box checked (the default), the security appliance
randomizes the sequence number of TCP packets. Each TCP connection has two ISNs: one
generated by the client and one generated by the server. The security appliance randomizes the ISN
of the TCP SYN passing in both the inbound and outbound directions.