


232 Managing supplies ENWW
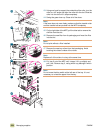
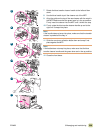
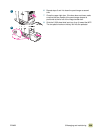
Replacing the image fuser kit
This image fuser kit contains one fuser.
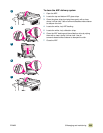
1 Replace the image fuser when REPLACE FUSER KIT appears
on the control-panel display.
2 On the left side of the MFP, move the finishing device away
from the MFP.
3 Open the lower door on the left side of the MFP.
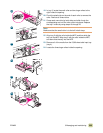
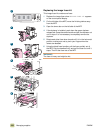
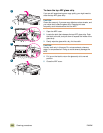
4 If the duplexer is installed, push down the green duplexer-
release tab. Grasp the center handle and pull the duplexer out
until it stops. It is not necessary to completely remove the
duplexer.
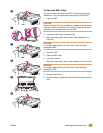
5 Rotate each blue fuser lever inward until it is in the horizontal
position, making sure not to pinch your fingers when the
levers are released.
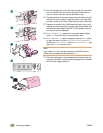
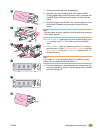
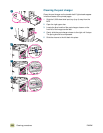
6 Using the black fuser handles, pull the fuser partially out of
the MFP. Grip the handles firmly and pull the fuser out until it
stops. Then lift the fuser out of the MFP.
WARNING!
The fuser is heavy and might be hot.
4
3
1
5
6
2