


26 Loading input trays ENWW
To load custom media in tray 2 and tray 3
Use this procedure to load custom-size media in the tray.
CAUTION
To avoid a jam, never add or remove media from a tray while
printing from that tray.
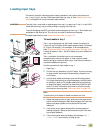
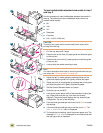
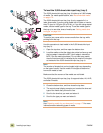
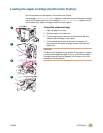
1 Pull the tray open until it stops.
2 Press the tab on the front (X) paper guide and slide the guide
all the way out.
3 Press the tab on the left (Y) paper guide and slide the guide
all the way out.
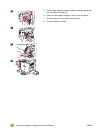
4 Load (orient) the media according to size.
Note
For more information about how to orient the media size that you
are using, see “Orienting media” on page 168.
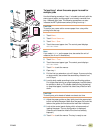
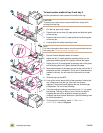
5 Set the Custom/Standard switch to Custom.
6 Adjust the left (Y) media guide by pressing the tab on the
guide and slide the guide until it gently touches the paper.
7 Adjust the front (X) media guide by pressing tab on the guide
and slide the guide until it gently touches the paper.
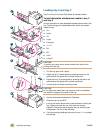
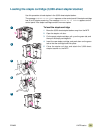
8 Note the orientation of the paper, as well as the value of the X
dimension and the Y dimension. The X and Y dimensions are
marked in the tray. You will need this information for a later
step.
9 Slide the tray into the MFP.
10 Look at the control panel within a few seconds of closing the
tray. (Open and close the tray if the time has already
elapsed.) The control panel displays the tray size and type
configuration. Do one of the following:
● If the size and type settings are correct, touch EXIT to accept
the settings. The tray is ready to use. (You do not need to
complete the rest of this procedure unless you want to
configure the exact custom dimension. See the following note
for more information.)
● To change the size setting, touch OK. The TRAY N
SIZE=*<SIZE> menu is displayed.
6
1
4
5
9
7