


254 Relocating the MFP ENWW
After the MFP is in the new location
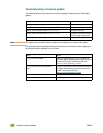
Complete the following tasks, in order.
Task Additional information
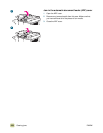
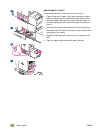
❏ Unlock the scan head by using the
carriage lock.
See “Setting up the MFP” on page 377.
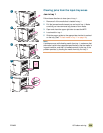
❏ Install the 2,000-sheet side input tray
(tray 4).
See “Setting up the MFP” on page 377.
❏ Install the finishing device.
See “Setting up the MFP” on page 377.
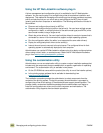
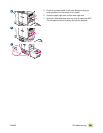
❏ Install the image transfer cleaner.
See “Replacing the image cleaning kit” on
page 228.
❏ Install the toner collection bottle.
See “Replacing the image cleaning kit” on
page 228, step 11.
❏ Install the image drums.
See “Replacing the image drums” on page 218
❏ Install the print cartridges.
See “Replacing the print cartridges” on
page 215.
❏ Load the input trays.
See “Loading input trays” on page 19.
❏ Connect the parallel and network cables.
See “Setting up the MFP” on page 377.
❏ Connect the power cord and turn on the
MFP.
See “Setting up the MFP” on page 377.
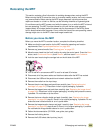
❏ Print a configuration page.
See “Configuration page” on page 346.
❏ If applicable, install the MFP software.
See “Setting up the MFP” on page 377.
❏ Make sure that the MFP is set up
correctly.
Verify the MFP setup by making a copy,
sending a document to an e-mail address, and
printing a document.