


386 ENWW
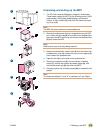
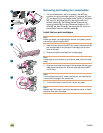
Install the four image drums
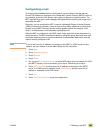
1 Swing the large, green lever down.
2 Rotate the blue dial upward until it clicks and the image-drum
door unlatches. Open the image-drum door completely.
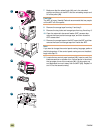
3 Remove the yellow image drum from its packaging.
Note
Do not remove the protective cover on the underside of the drum
unit step 6. Do not touch the green component inside the drum
cartridge. If toner gets on your clothes or your hands, wash them
with cold water.
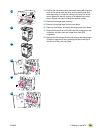
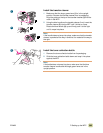
4 Place the drum on a level surface. 4a) Pull the orange ring on
the end of the drum all the way out to remove the seal from
inside the drum. 4b) Pull the orange handle on the top of the
drum to remove the protective sheet, the silica gel pack, and
the orange tape, and then discard the packaging that was
removed. 4c) Pull the two orange rings on the side of the
drum.
Note
Do not shake the drum.
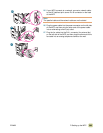
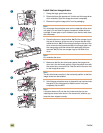
5 Make sure that the four blue levers above the image-drum
door are in the horizontal position. Align the yellow drum with
the correct slot, arrow-end first. Rest the end of the drum flat
on the image-drum door.
Note
The four blue levers must be in the horizontal position so that the
image drums can be installed.
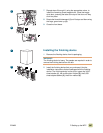
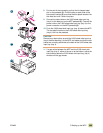
6 Hold the gray protective cover in place with one hand and use
the palm of your other hand to slide the drum firmly and
completely into the MFP.
Note
If the drum does not fit into the slot, make sure that you are
installing the correct color drum in the correct slot, and that you
have the drum aligned correctly.
2
3
4
5
1
6