


ENWW 1 MFP basics 29
Changing and setting the media size and type for a tray
You can configure the MFP input trays by type and size. You can load different media in
the input trays and then request media by type or size.
Note If you have used previous HP LaserJet printers or MFPs, you might be accustomed to
configuring tray 1 to first mode or cassette mode. To duplicate the settings for first mode,
configure tray 1 for Size = ANYSIZE and Type = ANY. To duplicate the settings for cassette
mode, set either the size or type for tray 1 to a setting other than ANY.
The following instructions are used to configure the trays at the MFP control panel. You
can also configure the trays from your computer by using the embedded Web server. For
more information, see “Using the embedded Web server” on page 207.
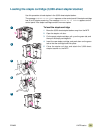
To set or change media size for tray 1
1 Press the MENU button.
2 Touch P
APER HANDLING.
3 Touch T
RAY 1 SIZE.
4 Touch the paper size that is loaded.
5 Touch E
XIT to exit the menus.
To set a standard size for tray 2, tray 3, and the 2,000-sheet side input
tray (tray 4)
The MFP automatically detects the size that is loaded, so you do not need to set the size
manually.
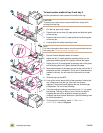
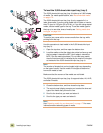
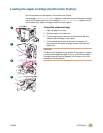
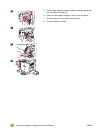
To set or change a custom size for tray 2 and tray 3
1 Make sure that the switch inside the tray that you want to configure is in the Custom
position.
2 A message on the control panel prompts you to specify the paper size.
3 Touch the appropriate unit of measure (M
ILLIMETERS or INCHES). (The default is
M
ILLIMETERS because the marks on the tray guides are in millimeters.)
4 Use the numeric keypad to specify the tray X (front-to-back) dimension.
5 Use the numeric keypad to specify the tray Y (left-to-right) dimension.
6 Touch E
XIT to exit the menus.
Note See “Setting media size and type” on page 164 for more information.