


ENWW 9 Managing and maintaining 253
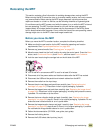
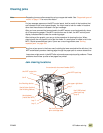
Relocating the MFP
This section contains critical information for avoiding damage when moving the MFP.
Before moving the MFP across the room or to another nearby location, be sure to remove
any jammed media. Before moving the MFP longer distances, including moves that
require an elevator or a ride in a vehicle, use the following checklist as a general guide.
Do not disconnect the MFP’s power cord while the power is on or while the MFP’s internal
fans are operating. The MFP must be allowed to cool until the fans stop operating
(approximately 30 minutes) before the power cord is disconnected. If the MFP’s power
cord is disconnected while the power is on or while the internal fans are operating, severe
damage might occur to the MFP’s fuser and image transfer belt.
Before you move the MFP
Before you move the MFP to another location, complete the following checklist:
❏ Make sure that the new location for the MFP meets the operating and location
requirements. See “Physical specifications” on page 359.
❏ Remove any jammed media. See “Clearing jams” on page 257.
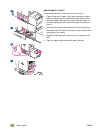
❏ Move the scan head into the “lock” position by using the control panel. Press the MENU
button, touch C
ONFIGURE DEVICE, touch RESETS, and then touch LOCK CARRIAGE.
❏ Lock the scan head using the carriage lock on the left side of the MFP.
❏ Turn off the MFP and allow the MFP to cool for at least 30 minutes.
❏ Disconnect all of the power cables and Jetdirect cables after the MFP has cooled.
❏ Disconnect the USB and the parallel and network cables from the MFP.
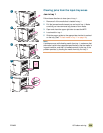
❏ Remove the media from the input trays.
❏ Remove the print cartridges and pack them carefully (see “Replacing the print
cartridges” on page 215). Place them in their original packaging, if possible.
❏ Remove the image drums and pack them carefully (see “Replacing the image drums”
on page 218). Place them in their original packaging, including their protective covers,
if possible. Do not shake or tip the drums.
❏ Remove the toner collection bottle and pack it carefully (see “Replacing the image
cleaning kit” on page 228, step 6). Place it in its original packaging, if possible. Do not
shake the toner collection bottle or turn it upside down.
❏ Remove the image transfer cleaner and pack it carefully (see “Replacing the image
cleaning kit” on page 228, steps 8 and 9). Place it in its original packaging, if possible.
Do not shake the image transfer cleaner or turn it upside down.
❏ Gather the documentation (CD-ROM, user guide, start guide).
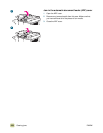
❏ Remove the finishing device.
❏ Remove the 2,000-sheet side input tray (tray 4).