


DellPowerConnectW-SeriesArubaOS6.2 | User Guide NetworkConfigurationParameters | 108
Chapter 7
Network Configuration Parameters
The following topics in this chapter describe some basic network configuration on the controller:
l "Configuring VLANs" on page 108
l "Configuring Ports " on page 114
l "Understanding VLAN Assignments" on page 117
l "Configuring Static Routes" on page 123
l "Configuring the Loopback IP Address" on page 124
l "Configuring the Controller IP Address" on page 125
l "Configuring GRE Tunnels" on page 125
Configuring VLANs
The controller operates as a layer-2 switch that uses a VLAN as a broadcast domain. As a layer-2 switch, the
controller requires an external router to route traffic between VLANs. The controller can also operate as a layer-3
switch that can route traffic between VLANs defined on the controller.
You can configure one or more physical ports on the controller to be members of a VLAN. Additionally, each wireless
client association constitutes a connection to a
virtual port on the controller
, with membership in a specified VLAN.
You can place all authenticated wireless users into a single VLAN or into different VLANs, depending upon your
network. VLANs can exist only inside the controller or they can extend outside the controller through 802.1q VLAN
tagging.
You can optionally configure an IP address and netmask for a VLAN on the controller. The IP address is
up
when at
least one physical port in the VLAN is up. The VLAN IP address can be used as a gateway by external devices;
packets directed to a VLAN IP address that are not destined for the controller are forwarded according to the
controller’s IP routing table.
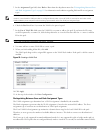
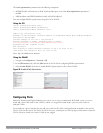
Creating and Updating VLANs
You can create and update a single VLAN or bulk VLANs.
In the WebUI
1. Navigate to the Configuration > Network > VLANs page.
2. Click Add a VLAN to create a new VLAN. (To edit an existing VLAN click Edit for the VLAN entry.) See
"Creating Bulk VLANs In the WebUI" on page 109 to create a range of VLANs.
3. In the VLAN ID field, enter a valid VLAN ID. (Valid values are from 1 to 4094, inclusive).
4. To add physical ports to the VLAN, select Port. To associate the VLAN with specific port-channels, select Port-
Channel.
5. (Optional) Click the Wired AAA Profile drop-down list to assign an AAA profile to a VLAN. This wired AAA
profile enables role-based access for wired clients connected to an untrusted VLAN or port on the controller.