


69 |The BasicUser-CentricNetworks DellPowerConnectW-SeriesArubaOS6.2 | User Guide
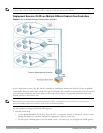
2. Create a VLAN that has the same VLAN ID as the VLAN on the switch or router to which you will connect the
controller. Add the uplink port on the controller to this VLAN and configure the port as a trunk port.
3. Add client VLANs to the trunk port.
4. Configure the default gateway on the controller. This gateway is the IP address of the router to which you will
connect the controller.
5. Configure the loopback interface for the controller.
6. Connect the uplink port on the controller to the switch or router interface.
7. Deploy APs. The APs will use DNS or DHCP to locate the controller.
8. Now configure VLANs on the controller for the wireless client subnetworks and configure SSIDs with the VLANs
assigned for each wireless subnetwork.
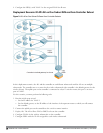
Configuring the Controller
The tasks in deploying a basic user-centric network fall into two main areas:
l Configuring and connecting the controller to the wired network (described in this section)
l Deploying APs (described later in this section)
To connect the controller to the wired network:
1. Run the initial setup to configure administrative information for the controller.
Initial setup can be done using the browser-based Setup Wizard or by accessing the initial setup dialog via a
serial port connection. Both methods are described in the
Dell PowerConnect W-Series ArubaOS Quick Start
Guide
and are referred to throughout this
chapter
as “initial setup.”
2. (Deployment #3) Configure a VLAN to connect the controller to your network. You do
not
need to perform this
step if you are using VLAN 1 to connect the controller to the wired network.
3. (Optional) Configure a loopback address for the controller. You do
not
need to perform this step if you are using
the VLAN 1 IP address as the controller’s IP address. Disable spanning tree on the controller if necessary.
4. Configure the system clock.
5. (Optional) Install licenses; refer to Software Licenses on page 100.
6. Connect the ports on the controller to your network.
This section describes the steps in detail.
Running Initial Setup
When you connect to the controller for the first time using either a serial console or a Web browser, the initial setup
requires you to set the role (master or local) for the controller and passwords for administrator and configuration
access.
NOTE: Do not connect the controller to your network when running the initial setup. The factory-default controller boots up with a
default IP address and both DHCP server and spanning tree functions are not enabled. Once you have completed the initial setup,
you can use either the CLI or WebUI for further configuration before connecting the controller to your network.
The initial setup might require that you specify the country code for the country in which the controller will operate;
this sets the regulatory domain for the radio frequencies that the APs use.
NOTE: You cannot change the country code for Dell controllers designated for certain countries, such as the U.S. Improper country
code assignment can disrupt wireless transmissions. Many countries impose penalties and sanctions for operators of wireless
networks with devices set to improper country codes. If none of the channels supported by the AP you are provisioning have
received regulatory approval by the country whose country code you selected, the AP will revert to Air Monitor mode.