


342 | VirtualAPs DellPowerConnectW-SeriesArubaOS6.2 | User Guide
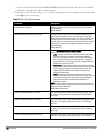
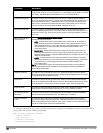
Parameter Description
is allowed. If you do not want to use 40 Mhz operation, select the 40MHz intolerance
checkbox to enable this feature.
honor 40MHz intolerance When enabled, the radio will stop using the 40 MHz channels if the 40 MHz intolerance
indication is received from another AP or station. Uncheck the Honor 40 Mhz intolerance
checkbox to disable this feature.
Default: Enabled
Diversity Spreading
Workaround
Most transmissions to high throughput (HT) stations are sent through multiple antennas
using cyclic shift diversity (CSD). When you enable the Diversity Spreading Workaround
parameter, CSD is disabled and only one antenna transmits data, even if they are being
sent to high-throughput stations. This enables interoperability for legacy or high-
throughput stations that cannot decode 802.11n CDD data. This option is disabled by
default, and should only be enabled under the supervision of Dell technical support.
Use this feature to turn off antenna diversity when the AP must support legacy clients
such as Cisco 7921g VoIP phones, or older 802.11g clients (e.g. Intel Centrino clients).
Note, however, that enabling this feature can reduce overall throughput rates.
6. Select the 802.11g radio profile.
NOTE: This radio profile represents activity on the 2.4 GHz frequency band. Since the high-throughput IEEE 802.11n standard operates
on the 5 GHz and/or 2.4 GHz frequency band, high-throughput can be enabled on 802.11a or 802.11g radio profiles.
a. Select New from the 802.11g radio profile drop-down menu.
b. Enter ht-corpnet-g for the 802.11a radio profile name.
c. Select (check) the High Throughput enable (radio) checkbox to enable high-throughput. By default, this is
enabled (checked).
d. Click Apply.
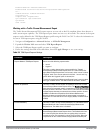
7. Select the High-throughput Radio Profile under the 802.11g radio profile.
a. Select New from the High-throughput Radio Profile drop-down menu.
b. Enter ht-radiog-corpnet for the high-throughput radio profile name.
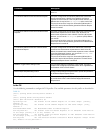
c. Configure the high-throughput radio settings (see Table 94 for details) and Click Apply.
8. Select Wireless LAN, under the Profiles list, to reveal the WLAN profiles.
9. Select the Virtual AP profile.
a. Select New from the Add a Profile drop-down menu.
b. Enter ht-vap-corpnet for the virtual AP profile name.
c. Click Add.
d. Select New from the SSID Profile drop-down menu associated with the “ht-vap-corpnet” virtual AP profile.
The SSID Profile dialog box appears.
e. Enter ht-corpnet for the SSID profile name.
f. Click Apply to create the SSID profile and return to the virtual AP profile page.
g. Click Apply on the virtual AP profile page.
10. Select the ht-vap-corpnet virtual AP profile.
a. Select all from the Allowed band drop-down menu.
b. Click Apply.
11. Select the SSID profile ht-corpnet. The High-throughput SSID profile option will appear below ht-corpnet in the
profiles list.