


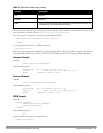
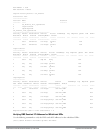
After writing your own HTML, then you need to ensure that your customized pop-up box will access your new
logged out file. In the pop-up box example above, you simply replace the "/auth/logout.html" with your own file that
you upload to the controller. For example, if your customized logout HTML is stored in a file called "loggedout.html"
then your "pop-up.html" file should reference it like this:
<html>
<body bgcolor=white text=000000>
<font face="Verdana, Arial, Helvetica, sans-serif" size=+1>
<b>Logout</b></font>
<p>
<a href="/upload/loggedout.html"> Click to Logout </a>
</body>
</html>
Creating Walled Garden Access
On the Internet, a walled garden typically controls a user’s access to web content and services. The walled garden
directs the user’s navigation within particular areas to allow access to a selection of websites or prevent access to
other websites.
NOTE: The Walled Garden feature can be used with the PEFNG or PEFV licenses.
Walled garden access is needed when an external or internal captive portal is used. A common example could be a
hotel environment where unauthenticated users are allowed to navigate to a designated login page (for example, a
hotel website) and all its contents.
Users who do not sign up for Internet service can view “allowed” websites (typically hotel property websites). The
website names must be DNS-based (not IP address based) and support the option to define wildcards. This works
for client devices with or without HTTP proxy settings.
When a user attempts to navigate to other websites not configured in the white list walled garden profile, the user is
redirected back to the login page. In addition, the black listed walled garden profile is configured to explicitly block
navigation to websites from unauthenticated users.
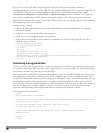
In the WebUI
1. Navigate to Advanced Services > Stateful Firewall > Destination.
2. ClickAdd to add a destination name.
3. Select the controller IP version, IPv4 or IPv6, from the IP Versiondrop-down menu.
4. In the Destination Name field, enter a name and click Add.
5. Select namefrom the Rule Type drop-down menu and add a hostname or wildcard with domain name to which
an unauthenticated user is redirected.
6. ClickApply.
7. Navigate to Configuration > Security > Authentication > L3 Authentication.
8. Select Captive Portal Authentication Profile.
9. To allow users to access a domain, enter the destination name that contains the allowed domain names in the
White List field. This stops unauthenticated users from viewing specific domains such as a hotel website.
A rule in the white list must explicitly permit a traffic session before it is forwarded to the controller. The last
rule in the white list denies everything else.
10. To deny users access to a domain, enter the destination name that contains prohibited domain names in the
Black List field. This prevents unauthenticated users from viewing specific websites.
DellPowerConnectW-SeriesArubaOS6.2 | User Guide CaptivePortalAuthentication | 265