


537 | Remote AccessPoints DellPowerConnectW-SeriesArubaOS6.2 | User Guide
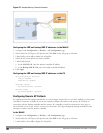
Configuring the Session ACL Allowing Tunneling
First you need to configure a session ACL that “permits” corporate traffic to be forwarded (tunneled) to the
controller, and that “routes”, or locally bridges, local traffic.
Using the WebUI
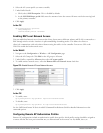
1. Navigate to the Configuration > Security > Access Control > Policies page.
2. Click Add to crete a new policy.
3. Enter the policy name in the Policy Name field.
4. From the Policy Type drop-down list, select Session.
5. From the IP Version drop-down list, select IPv4 or IPv6.
6. To create the first rule:
a. Under Rules, click Add.
b. Under Source, select any.
c. Under Destination, select any.
d. Under Service, select service. In the service drop-down list, select svc-dhcp.
e. Under Action, select permitforIPv4 orcaptivefor IPv6.
f. Click Add.
7. To create the next rule:
a. Under Rules, click Add.
b. Under Source, select any.
c. Under Destination, select alias.
The following steps define an alias representing the corporate network. Once defined, you can use the alias for
other rules and policies. You can also create multiple destinations the same way.
8. Under the alias section, click New. Enter a name in the Destination Name field.
a. Click Add.
b. For Rule Type, select Network.
c. Enter the public IP address of the controller.
d. Enter the Network Mask/Range.
e. Click Add to add the network range.
f. Click Apply. The new alias appears in the Destination menu.
9. Under Destination, select the alias you just created.
10. Under Service, select any.
11. Under Action, select permitfor IPv4 or captivefor IPv6.
12. Click Add.
13. To create the next rule:
a. Under Rules, click Add.
b. Under Source, select user.
c. Under Destination, select any.
d. Under Service, select any.
e. Under Action, select any and check src-nat.
f. Click Add.
14. Click Apply.