


2. Enter the IP address of the SMTP server to which the controller sends the guest provisioning email in the IP
Address of SMTP server field.
3. Enter the number of the port through which the guest provisioning email passes in the Port field.
4. Click Apply and then Save Configuration.
Configuring an SMTP server and port in the CLI
The following command creates a guest-access email and sends guest user email through SMTP server IP address
1.1.1.1 on port 25.
(host) (config) #guest-access-email
(host) (Guest-access Email) #
(host) (Guest-access Email) #smtp-port 25
(host) (Guest-access Email) #smtp-server 1.1.1.1
Creating Email Messages in the WebUI
After you configured the SMTP server and port, follow these steps:
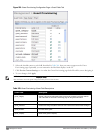
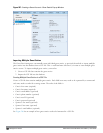
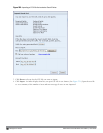
1. Navigate to the Configuration > Management > Guest Provisioningpageand select the Email tab.
Figure 262: Guest Provisioning Configuration Page—Email Tab
2. To create a message for a guest or sponsor, customize the text in the Subject, From and Body fields as needed
for both the Guest message and Sponsor message.
3. Optionally, select the Send automatically at account creation time checkbox when you want an email message
to be sent to the guest and/or sponsor alerting them that a guest account has just been created.
NOTE: Regardless of whether you select this option, the person responsible for managing the Guest Provisioning page may choose
to send this email message manually at any time.
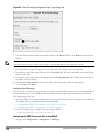
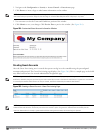
Figure 263 shows a sample email message that is sent to the guest after the guest account is created.
DellPowerConnectW-SeriesArubaOS6.2 | User Guide Management Access | 647