


236 | CaptivePortalAuthentication DellPowerConnectW-SeriesArubaOS6.2 | User Guide
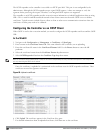
2. To specify authentication servers, select Server Group under the captive portal authentication profile you just
configured.
a. Select the server group (for example, cp-srv) from the drop-down menu.
b. Click Apply.
3. Select the AAA Profiles tab.
a. In the AAA Profiles Summary, click Add to add a new profile. Enter the name of the profile (for example,
aaa_c-portal), then click Add.
b. Select the AAA profile you just created.
c. For Initial Role, select the captive portal authentication profile (for example, c-portal) you created previously.
NOTE: The Initial Role must be exactly the same as the name of the captive portal authentication profile you created.
d. Click Apply.
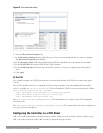
4. Navigate to the Configuration > Wireless > AP Configuration page. Select either the AP Group or AP Specific
tab. Click Edit for the applicable AP group name or AP name.
5. Under Profiles, select Wireless LAN, then select Virtual AP.
6. To create a new virtual AP profile, select NEW from the Add a profile drop-down menu. Enter the name for the
virtual AP profile (for example, vp_c-portal), then click Add.
a. In the Profile Details entry for the new virtual AP profile, select the AAA profile you previously created from
the AAA Profile drop-down menu. A pop-up window displays the configured AAA profile parameters. Click
Apply in the pop-up window.
b. From the SSID profile drop-down menu, select NEW. A pop-up window allows to you configure the SSID
profile.
c. Enter the name for the SSID profile (for example, ssid_c-portal).
d. Enter the Network Name for the SSID (for example, c-portal-ap).
e. Click Apply in the pop-up window.
f. At the bottom of the Profile Details page, click Apply.
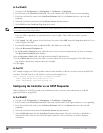
7. Click on the new virtual AP name in the Profiles list or in Profile Details to display configuration parameters.
a. Make sure Virtual AP enable is selected.
b. For VLAN, select the VLAN to which users are assigned (for example, 20).
c. Click Apply.
In the CLI
To configure captive portal in the base operating system via the command-line interface, access the CLI in config
mode and issue the following commands:
(host)(config) #aaa authentication captive-portal c-portal
server-group cp-srv
(host)(config) #aaa profile aaa_c-portal
initial-role c-portal
(host)(config) #wlan ssid-profile ssid_c-portal
essid c-portal-ap
(host)(config) #wlan virtual-ap vp_c-portal
aaa-profile aaa_c-portal
ssid-profile ssid_c-portal
vlan 20