


234 | CaptivePortalAuthentication DellPowerConnectW-SeriesArubaOS6.2 | User Guide
Policy Enforcement Firewall Next Generation (PEFNG) License
You can use captive portal with or without the PEFNG license installed in the controller. The PEFNG license
provides identity-based security to wired and wireless clients through user roles and firewall rules. You must purchase
and install the PEFNG license on the controller to use identity-based security features.
There are differences in how captive portal functions work and how you configure captive portal, depending on
whether the license is installed. Other parts of this
chapter
describe how to configure captive portal in the base
operating system (without the PEFNG license) and with the license installed.
Controller Server Certificate
The Dell controller is designed to provide secure services through the use of digital certificates. A server certificate
installed in the controller verifies the authenticity of the controller for captive portal.
Dell controllers ship with a demonstration digital certificate. Until you install a customer-specific server certificate in
the controller, this demonstration certificate is used by default for all secure HTTP connections such as captive
portal. This certificate is included primarily for the purposes of feature demonstration and convenience and is not
intended for long-term use in production networks. Users in a production environment are urged to obtain and install
a certificate issued for their site or domain by a well-known certificate authority (CA). You can generate a
Certificate Signing Request (CSR) on the controller to submit to a CA. For information on how to generate a CSR
and how to import the CA-signed certificate into the controller, see "Managing Certificates" on page 635 in
Management Access on page 625.
Once you have imported a server certificate into the controller, you can select the certificate to be used with captive
portal as described in the following sections.
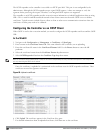
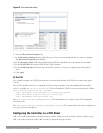
To select a certificate for captive portal using the WebUI:
1. Navigate to the Configuration > Management > General page.
2. Under Captive Portal Certificate, select the name of the imported certificate from the drop-down list.
3. Click Apply.
To select a certificate for captive portal using the command-line interface, access the CLI in config mode and issue
the following commands:
(host)(config) #web-server
captive-portal-cert <certificate>
To specify a different server certificate for captive portal with the CLI, use the no command to revert back to the
default certificate
before
you specify the new certificate:
(host)(config) #web-server
captive-portal-cert ServerCert1
no captive-portal-cert
captive-portal-cert ServerCert2
Configuring Captive Portal in the Base Operating System
The base operating system (ArubaOS without any licenses) allows full network access to all users who connect to an
ESSID, both guest and registered users. In the base operating system, you cannot configure or customize user roles;
this function is only available by installing the PEFNG license. Captive portal allows you to control or identify who
has access to network resources.
When you create a captive portal profile in the base operating system, an implicit user role is automatically created
with same name as the captive portal profile. This implicit user role allows only DNS and DHCP traffic between the
client and network and directs all HTTP or HTTPS requests to the captive portal. You cannot directly modify the