


320 | VirtualAPs DellPowerConnectW-SeriesArubaOS6.2 | User Guide
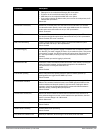
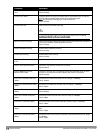
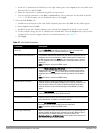
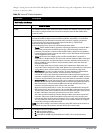
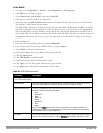
Parameter Description
Enforce DHCP When you select this option, clients must obtain an IP using DHCP before they
are allowed to associate to an AP. Enable this option when you create a user
rule that assigns a specific role or VLAN based upon the client device’s type.
For details, see "Working with User-Derived VLANs" on page 306.
NOTE: If a client is removed from the user table by the “Logon user lifetime”
AAA timer, then that client will not be able to send traffic until it renews it’s
DHCP.
3. Select the 802.1x Authentication Profile under the corpnet AAA profile to reveal the 802.1X Authentication
Profile pane.
a. Click the 802.1X Authentication Profile drop-down list and select corpnet.
b. Click Apply.
4. Select the 802.1x Authentication Server Group under the corpnet AAA profile to reveal the 802.1X
Authentication Server Group pane.
a. Click the 802.1X Authentication Server Group drop-down list and select the corpnet server group you
previously configured.
b. Click Apply.
In the CLI
(host)(config) #aaa authentication dot1x corpnet
(host)(config) #aaa profile corpnet
authentication-dot1x corpnet
d>ot1x-default-role employee
d>ot1x-server-group corpnet
radius-interim-accounting
Applying the Virtual AP
In this example, you apply the corpnet virtual AP to the “default” AP group which consists of all APs.
In the WebUI
1. Navigate to the Configuration > Wireless > AP Configuration > AP Group page.
2. Click Edit for the “default” AP group.
3. Select Wireless LAN (under Profiles), then select Virtual AP.
4. Select New from the Add a profile drop-down menu. Enter the name for the virtual AP profile (for example,
corpnet), and click Add.
NOTE: Whenever you create a new virtual AP profile in the WebUI, the profile automatically contains the “default” SSID profile with
the default “Dell-ap” ESSID. You must configure a new ESSID and SSID profile for the virtual AP profile before you apply the profile.
5. Click the new Virtual AP name in the Profiles list or the Profile Details to display the configuration parameters
defined in Table 88.
6. Verify that Virtual AP enable is selected; select 1 for the VLAN.
7. Click Apply.
The Virtual AP profile is divided into two tabs, Basic and Advanced. The Basic tab displays only those configuration
settings that often need to be adjusted to suit a specific network. The Advanced tab shows all configuration
settings, including settings that do not need frequent adjustment or should be kept at their default values. If you