


609 | Spectrum Analysis DellPowerConnectW-SeriesArubaOS6.2 | User Guide
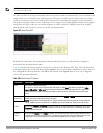
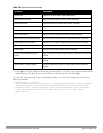
Command Description
show ap spectrum device-history This command displays spectrum analysis history for non-interfering devices.
show ap spectrum device-list Show a device summary table and channel information for non-Wi-Fi devices
currently seen by the spectrum monitor.
show ap spectrum device-log This command shows a time log of add and delete events for non-Wi-Fi devices.
show ap spectrum device-summary This command shows the numbers of Wi-Fi and non-Wi-Fi device types on each
channel monitored by a spectrum monitor.
show ap spectrum interference-
power
This command shows the interference power detected by a 802.11a or 80211g radio
on a spectrum monitor.
show ap spectrum monitors This command shows a list of APs currently configured as spectrum monitors.
show ap spectrum technical-support Save spectrum data for later analysis by your Dell technical support representative.
Recording Spectrum Analysis Data
The spectrum analysis tool allows you to record up to 60 continuous minutes (or up to 10 Mb) of spectrum analysis
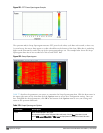
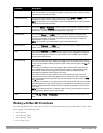
data. By default, each spectrum analysis recording displays data for the Real-Time FFT, FFT Duty Cycle,
Interference Power and Swept Spectrogram charts, however, you can view recorded device data for any the spectrum
analysis charts supported by that spectrum monitor radio. Configurable recording settings allow you to start a
recording session immediately, or schedule a recording to begin at a later date and time. Each recording can be
scheduled to end after a selected amount of time has passed, or continue on until the recorded data file reaches a
specified size. You can save the file to your spectrum monitor client, then play back that data at a later time.
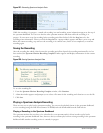
Creating a Spectrum Analysis Record
To record spectrum analysis data for later analysis:
1. Navigate to the Monitoring>Spectrum Analysis>Spectrum Dashboards window.
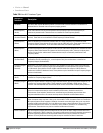
2. Click the Record button at the top of the window. The New Recording popup window appears.
3. Click the Record From link, and select the spectrum monitor whose data you want to record.
4. Next, decide whether you want the recording to start immediately, or at a later scheduled time. If you want the
recording to start immediately, select When the OK button is clicked. To schedule a different starting time for
the recording, click the date and time drop-down lists to select a starting month, day, year and time.
5. The recording continues until either the specified amount of time has passed, or until the recording files reaches
a selected size. Click the Length of recording reaches drop down list and select the amount of time the
recording should last, or click the Data file reaches drop down list and select the maximum file size for the
recording.
6. Click OK to save your settings. If you selected the When the OK button is clicked in step 5, the recording
begins.