


implicit user role or its rules. Upon authentication, captive portal clients are allowed full access to their assigned
VLAN.
NOTE: The WLAN Wizard within the ArubaOS WebUI allows for basic captive portal configuration for WLANs associated with the
“default” ap-group: Configuration > Wizards > WLAN Wizard. Follow the steps in the workflow pane within the wizard and refer to
the help tab for assistance.
What follows are the tasks for configuring captive portal in the base ArubaOS. The example server group and profile
names appear inside quotation marks.
l Create the Server Group name. In this example, the server group name is “cp-srv”.
If you are configuring captive portal for registered users, configure the server(s) and create the server group. For
more information about configuring authentication servers and server groups, see Authentication Servers on page
168.
l Create Captive Portal Authentication Profile. In this example, the profile name is “c-portal”.
Create and configure an instance of the captive portal authentication profile. Creating the captive portal profile
automatically creates an implicit user role and ACL with the same name. Creating the profile “c-portal” creates
an implicit user role called “c-portal”. That user role allows only DNS and DHCP traffic between the client and
network and directs all HTTP or HTTPS requests to the captive portal.
l Create an AAA Profile. In this example, the profile name is “aaa_c-portal”.
Create and configure an instance of the AAA profile. For the initial role, enter the implicit user role that was
created in step on page 235. The initial role in the profile “aaa_c-portal” must be set to “c-portal”.
l Create SSID Profile. In this example, the profile name is “ssid_c-portal”.
Create and configure an instance of the virtual AP profile which you apply to an AP group or AP name. Specify
the AAA profile you created in step on page 235.
l Create a Virtual AP Profile. In this example, the profile name is “vp_c-portal”.
Create and configure an instance of the SSID profile for the virtual AP.
The following sections present the procedure for configuring the captive portal authentication profile, the AAA
profile, and the virtual AP profile using the WebUI or the command line (CLI). Configuring the VLAN and
authentication servers and server groups are described elsewhere in this document.
NOTE: In ArubaOS 2.5.2 and later 2.5.x releases, captive portal users in the base operating system are placed into the predefined
cpbase
initial user role before authentication. The
cpbase
role is not supported in ArubaOS 3.x. You need to create new captive
portal profiles in the base operating system, as described in this section, which automatically generates the required policies and
roles.
In the WebUI
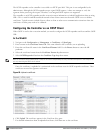
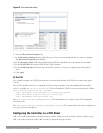
1. Navigate to the Configuration > Security > Authentication > L3 Authentication page. Select Captive Portal
Authentication Profile.
a. In the Captive Portal Authentication Profile Instance list, enter the name of the profile (for example, c-
portal), then click Add.
b. Select the captive portal authentication profile you just created.
c. You can enable user login and/or guest login, and configure other captive portal profile parameters as described
in Table 68.
d. Click Apply.
DellPowerConnectW-SeriesArubaOS6.2 | User Guide CaptivePortalAuthentication | 235